

Knowledge base
AI Translation User Guide - Page Studio
TABLE OF CONTENTS
- 1. About this guide
1.1 How to read the screenshots
2.2 What is translated, and when
4. Create secondary language pages
4.2 While the page is being translated
5. Track progress in the Translation Queue
7. Open language pages and set the sync mode
7.1 Open a secondary language page
8. Keep pages in sync automatically
11. Edit secondary language pages locally
11.4 Components added on a secondary language page
11.5 What happens to local edits after a sync
Quick finder
Start from what you want to do. Click the section to jump straight there.
I want to… | Go to |
Translate a page into another language | Chapter 4 |
Pick which languages to add | Section 4.1 |
See how far a translation has got | Chapter 5 |
Understand the coloured dots in the language menu | Section 3.1 |
Publish a secondary language page | Chapter 6 |
Open a secondary language page | |
Turn auto-sync on or off for a language | Section 7.2 |
Send a change on the primary page to all languages | Chapter 8 |
Update secondary pages that are set to Manual | Chapter 9 |
Choose between Full Override and Content-Only Sync | Section 9.1 |
Rebuild a secondary page from scratch | Section 9.3 |
Add a component to some languages and not others | Section 10.1 |
Remove a component from secondary pages | Section 10.2 |
Change text on one language only | Section 11.1 |
See which fields were edited locally | |
Undo a local edit | |
Check that my local edits survived a sync | Section 11.5 |
Fix something that looks wrong | Chapter 12 |
CHAPTER 1
1. About this guide
This guide shows you how to use AI Translation in Page Studio to create pages in other languages, keep them up to date and publish them. It is written for agency users who manage websites for clients, and for business users such as marketing managers and translators who review and publish language pages.
The examples use a fictional hotel website, Azure Coast Resort, with English as the primary language. The screens are illustrations: your pages, languages and content will look different, but the controls and steps are the same.
1.1 How to read the screenshots
- A numbered orange dot marks a control. The list under the screenshot explains each one, in order.
- A thick orange outline is the spotlight: the one thing that screenshot is about. A thinner orange outline marks a related area.
- A white card with an orange top edge is a tip about the highlighted control.
Coloured boxes flag information that needs attention:
GOOD TO KNOW | How something works. | |
TIP | A shortcut or habit that saves time. | |
IMPORTANT | Something to check so you do not get stuck. | |
CAUTION | An action that changes live content. |
1.2 Find what you need fast
- Use the Contents page or the Quick finder. Every entry is a link.
- Use the A to Z index at the back to look up a word.
- Press Ctrl+F, or Cmd+F on a Mac, to search the whole guide.
1.3 Words used in this guide
Word | What it means |
Primary language page | The original page that every translation comes from. The language menu labels its language Source Language. |
Secondary language page | A translated copy of the primary language page in another language. The language menu lists these under Translation Languages. |
Sync | Sending changes made on the primary language page to the secondary language pages. |
Auto-sync | Sync that runs on its own every time the primary language page is saved. Set per language. |
Manual sync | Sync that runs only when you click Sync Translation. |
Content-Only Sync | A sync that updates shared content and keeps everything you changed on the secondary language page. Auto-sync always works this way. |
Full Override | A sync that rebuilds the secondary language page from scratch and removes all local edits. |
Local edit | A change made directly on a secondary language page. Sync never overwrites it. |
Record | One set of content inside a component, such as one slide of a hero slider. You edit records in the Record Manager. |
Translation Queue | The panel at the bottom right of the editor that shows translation and sync progress. |
CHAPTER 2
2. How AI Translation works
Every translation starts from the primary language page. You never translate a page on its own: you add languages to the primary language page, and Page Studio creates a secondary language page for each one.
The primary language can be any language, such as English, French or Portuguese. A site has one primary language, and all its other languages are secondary languages. Page Studio supports more than 30 languages. The languages you can choose from depend on your package.
2.1 The two journeys
- Create: add languages, let AI translate the page, review the drafts and publish them.
- Maintain: keep secondary language pages in step with the primary language page through auto-sync or manual sync, while protecting the changes your local teams make.
2.2 What is translated, and when
Content | When the page is first created | When the page is synced |
Page components and their records | Translated | Updated |
Site shared and profile shared components on the page | Translated | Updated |
Independent components | Translated | Updated |
Page name, meta title and meta description | Translated | Not updated |
Fields you edited on the secondary language page | Not applicable | Kept as you left them |
IMPORTANT Meta information is translated only once The page name, meta title and meta description are translated when the secondary language page is created. Later syncs do not change them, so if you update the meta information on the primary language page, update it on each secondary language page too. |
CHAPTER 3
3. The language menu
Everything in AI Translation starts from the language menu at the top left of the editor. Open the primary language page in Page Studio and click the language name to open it.
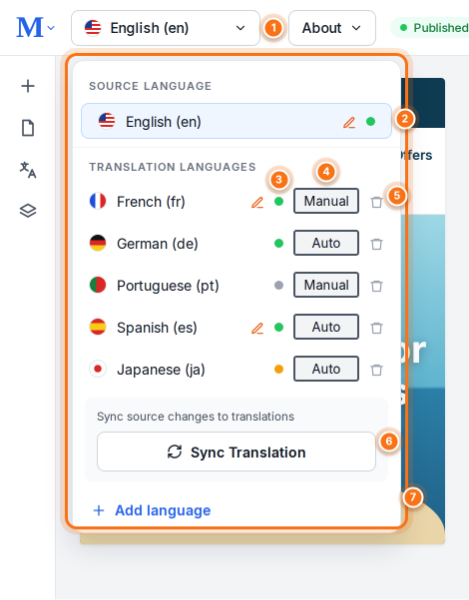
SCREENSHOT 01: The language menu on the primary language page.
1 | Language menu. Shows the language of the page you are editing. Click it to open the menu. |
2 | Source Language. The primary language. Every secondary language page is translated from this page. |
3 | Status dot. Shows whether that language page is published, draft or offline. See the table below. |
4 | Auto or Manual. The sync mode for that language. Click it to switch. |
5 | Delete. Removes that secondary language page. |
6 | Sync Translation. Sends changes from the primary language page to secondary language pages you choose. |
7 | Add language. Creates new secondary language pages. |
3.1 What the status dots mean
What you see | What it means |
Orange dot | Draft. The page has never been published. |
Green dot | Published. The live page matches the saved page. |
Green dot with an orange pencil | Published, with a newer draft on top that is not live yet. |
Gray dot | Taken offline after being published. |
CAUTION Deleting a language Clicking the bin icon removes that secondary language page. Check with the page owner before deleting a language that is published. |
CHAPTER 4
4. Create secondary language pages
4.1 Choose the languages
- Open the primary language page in Page Studio.
- Click the language menu at the top left.
- Click Add language.
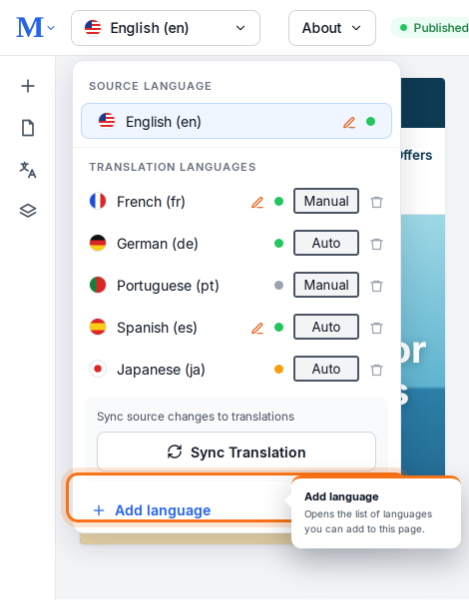
SCREENSHOT 02: Add language opens the list of languages you can add.
- In the Add language window, select one or more languages. Use the search box to find a language quickly.
- Leave Enable Auto-sync for the language page(s) switched on, or switch it off if you want to sync these pages yourself.
- Click Add and translate.
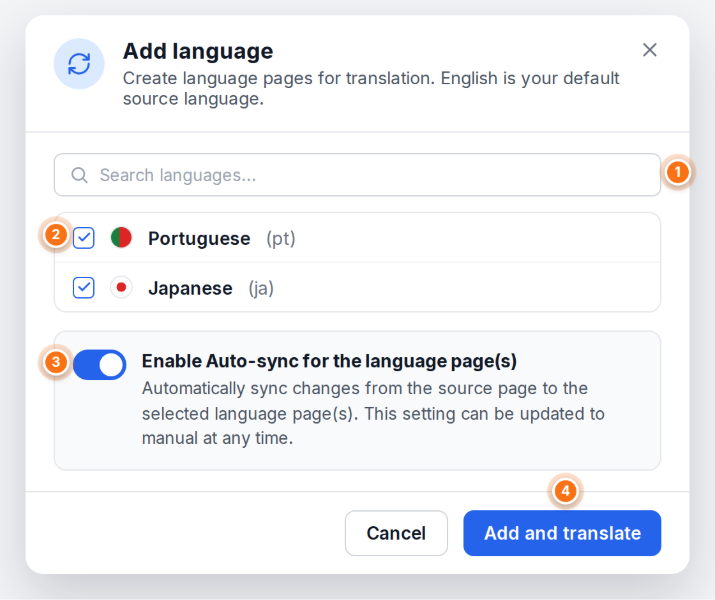
SCREENSHOT 03: The Add language window.
1 | Search languages. Type to filter the list. |
2 | Language checkbox. Select every language you want. You can add several at once. |
3 | Enable Auto-sync. On by default. When on, changes on the primary language page reach these pages automatically. You can change this later in the language menu. |
4 | Add and translate. Creates the secondary language pages and starts translating them. |
GOOD TO KNOW Which languages appear Page Studio supports more than 30 languages. The list shows the languages included in your package that this page does not have yet. |
4.2 While the page is being translated
Page Studio confirms that the language variation was created and starts translating. A short message appears while the first part runs, and the Translation Queue opens at the bottom right.
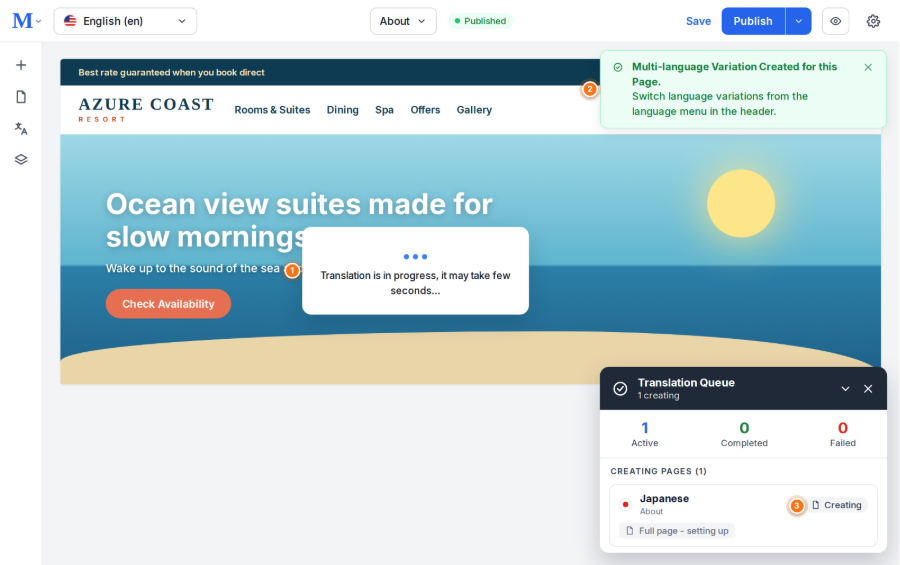
SCREENSHOT 04: Translation starts: the progress message, the confirmation and the Translation Queue.
1 | Progress message. Shows while the new language page is being set up. It usually takes a few seconds. |
2 | Confirmation. Tells you the language variation was created. You switch between languages from the language menu. |
3 | Creating. The first stage in the Translation Queue for a new language page. |
Once the page is set up, the Translation Queue shows how many records have been translated. Most pages finish in under a minute.
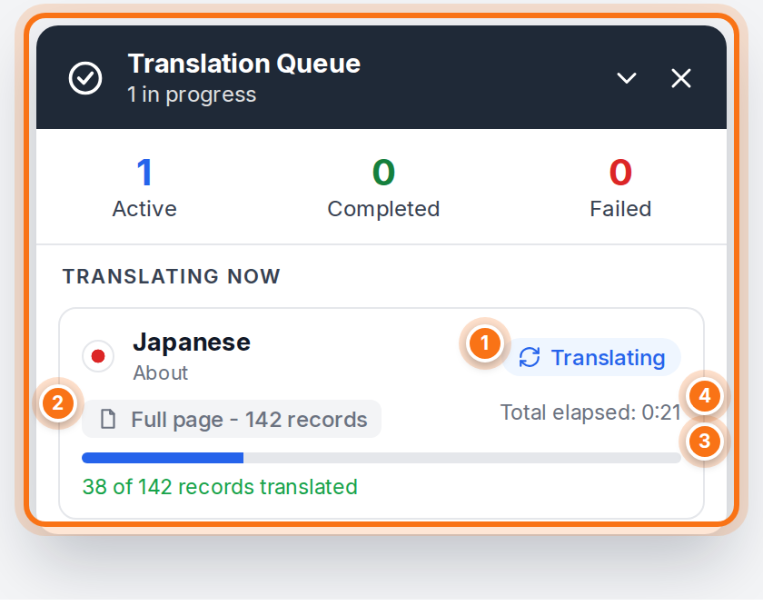
SCREENSHOT 05: A new language page being translated, record by record.
1 | Translating. The language page is being translated now. |
2 | Full page. A brand new language page. The number is how many records are being translated. |
3 | Progress bar. Fills as records are translated, with the count underneath. |
4 | Total elapsed. How long the job has been running. |
GOOD TO KNOW New pages are drafts Every new secondary language page is created as a draft, so nothing goes live until you review and publish it. See chapter 6. |
CHAPTER 5
5. Track progress in the Translation Queue
The Translation Queue opens at the bottom right of the editor whenever a translation or sync starts. Use it to see exactly where each language page is instead of guessing.
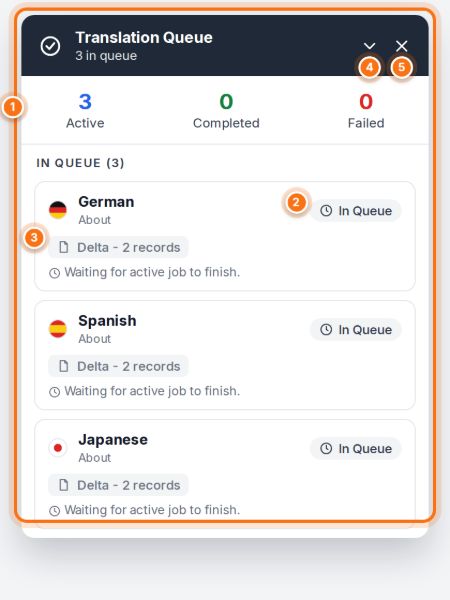
SCREENSHOT 06: Jobs waiting in the Translation Queue.
1 | Counters. How many jobs are active, completed and failed. |
2 | Status. In Queue means the job is waiting for the job ahead of it to finish. |
3 | Job type. Full page for a new language page, Delta for a sync of changes. The number is how many records are involved. |
4 | Minimise. Collapses the panel so you can keep working. |
5 | Close. Closes the panel. It opens again only when a new translation starts. |
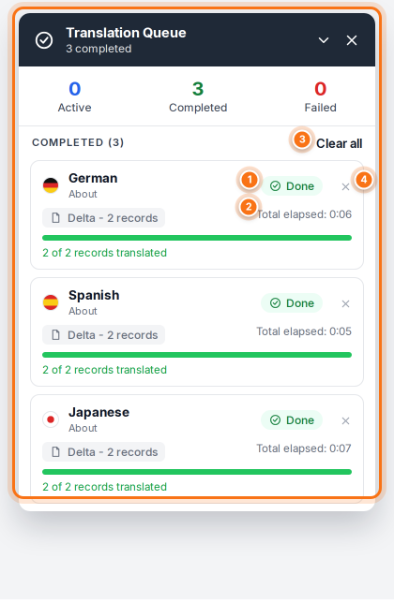
SCREENSHOT 07: Finished jobs in the Translation Queue.
1 | Done. The job finished successfully. |
2 | Total elapsed. How long the job took. |
3 | Clear all. Removes all finished jobs from the list. |
4 | Remove. Removes one finished job from the list. |
5.1 Job statuses
Status | What is happening |
Creating | A new secondary language page is being set up. |
In Queue | The job is waiting for the active job to finish. |
Translating | Records are being translated now. |
Done | The job finished. The secondary language page is saved as a draft. |
Failed | The job did not finish. See chapter 12. |
TIP Keep working You can minimise the queue and carry on editing. You cannot switch to a language page while it is being translated, but you can open any other language. |
CHAPTER 6
6. Review and publish
Translated and synced pages are always saved as drafts. Review each secondary language page, make any local changes your market needs, then publish.
- Open the page and click Publish at the top right.
- In the Publish Page window, check which pages are selected. The page you are on is selected; the other language pages are not.
- Select any other language pages you also want to publish, or click Select all.
- Click the arrow on a row to check its page name and meta information.
- Click Publish.
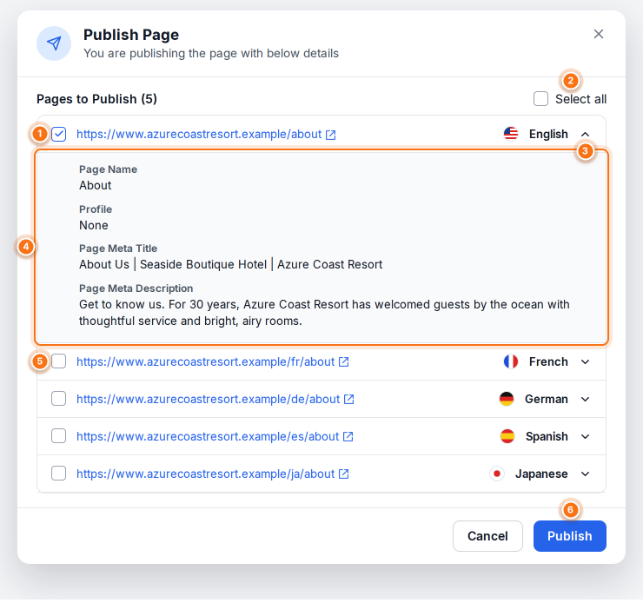
SCREENSHOT 08: The Publish Page window with the primary language page expanded.
1 | Page checkbox. Select each page you want to publish. |
2 | Select all. Selects every language page in the list. |
3 | Expand. Shows the page name, profile and meta information for that language. |
4 | Page details. Check these before publishing. |
5 | Secondary language pages. Not selected by default. You can publish the primary language page on its own. |
6 | Publish. Publishes the selected pages. |
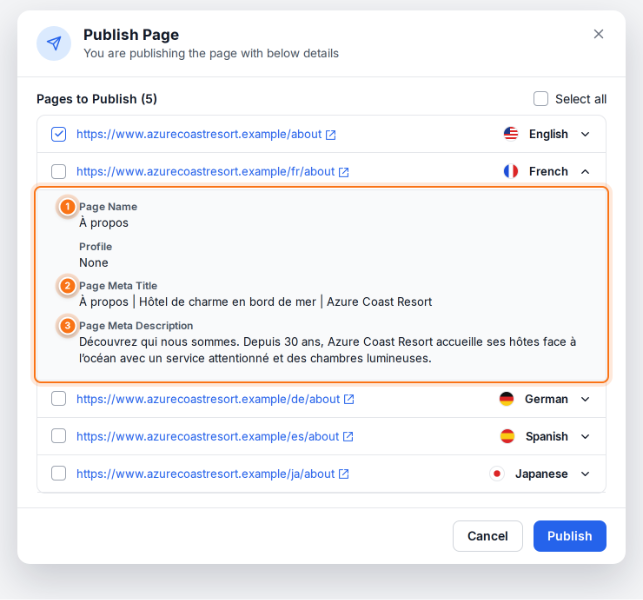
SCREENSHOT 09: Expanding a secondary language page shows its translated meta information.
1 | Page name. Translated when the page was created. |
2 | Page meta title. Translated when the page was created. |
3 | Page meta description. Translated when the page was created. Syncs do not change it. |
CAUTION Publishing makes pages live Everything you select goes live on your website. Review each secondary language page before you select it. |
CHAPTER 7
7. Open language pages and set the sync mode
7.1 Open a secondary language page
- Click the language menu.
- Click the language you want. The editor switches to that language page straight away.
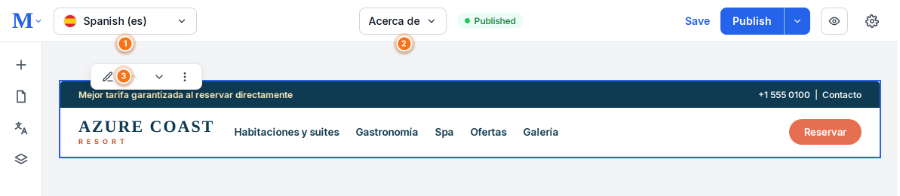
SCREENSHOT 10: Editing the Spanish secondary language page.
1 | Language menu. Shows the language page you are editing. |
2 | Page name. The translated page name. |
3 | Component toolbar. Appears when you hover over a component. Edit, move and other actions work as on any page. |
7.2 Turn auto-sync on or off
Each secondary language has its own sync mode. Click the Auto or Manual button next to a language to switch it. The change happens straight away and a message confirms it.
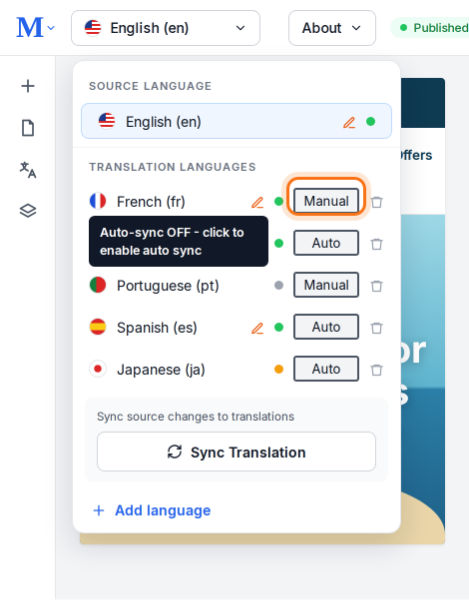
SCREENSHOT 11: Hovering over Manual shows that auto-sync is off for this language.
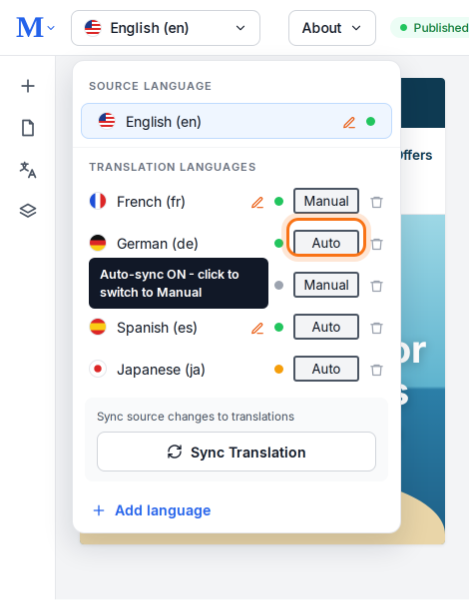
SCREENSHOT 12: Hovering over Auto shows that auto-sync is on for this language.
Mode | What happens when the primary language page is saved |
Auto | Changes are synced to this language straight away with Content-Only Sync. Local edits are kept. |
Manual | Nothing happens until you click Sync Translation. See chapter 9. |
GOOD TO KNOW Older languages start in Manual New languages start in Auto. Languages added before auto-sync was available start in Manual, so switch them to Auto if you want them updated automatically. |
CHAPTER 8
8. Keep pages in sync automatically
With auto-sync on, you only work on the primary language page. Saving the page sends your changes to every secondary language set to Auto.
- On the primary language page, hover over the component you want to change and click Edit.
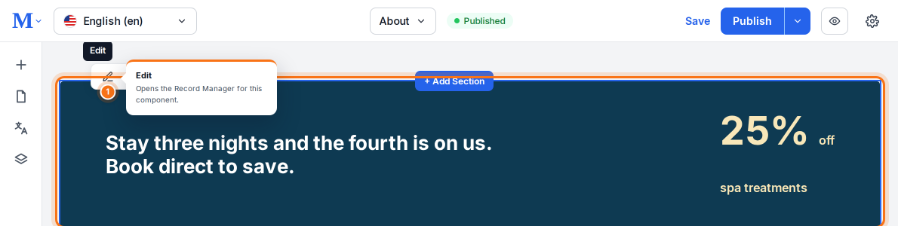
SCREENSHOT 13: The component toolbar with Edit.
- In the Record Manager, change the fields you need.
- Click Save & Close to save the record.
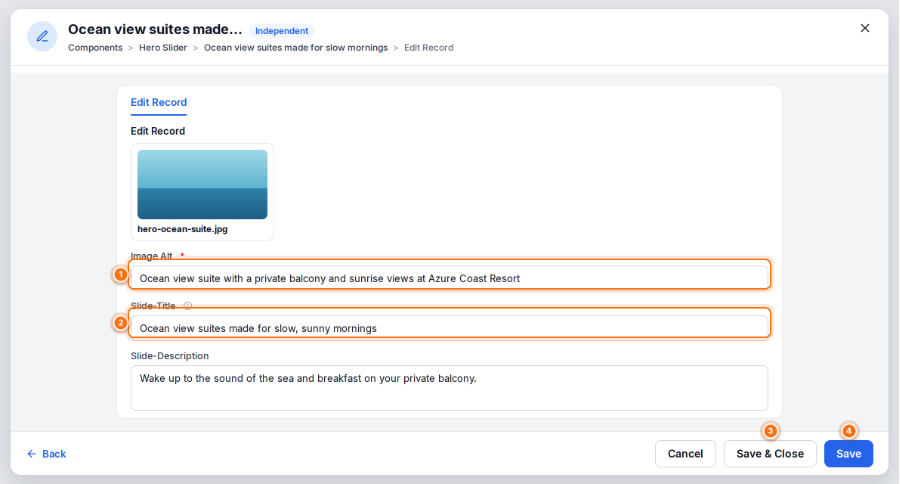
SCREENSHOT 14: Editing a record on the primary language page in the Record Manager.
1 | Image Alt. An edited field. |
2 | Slide-Title. Another edited field. |
3 | Save & Close. Saves the record and closes the Record Manager. This does not start a sync. |
4 | Save. Saves the record and keeps the Record Manager open. |
- Click Save at the top right of the page. This starts the sync.
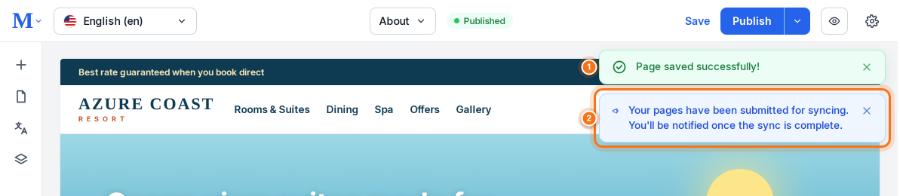
SCREENSHOT 15: Saving the page confirms the save and submits the language pages for syncing.
1 | Page saved. The primary language page was saved. |
2 | Submitted for syncing. Every language set to Auto is now in the Translation Queue. You are told when the sync is complete. |
- Follow progress in the Translation Queue. Sync jobs show as Delta with the number of records that changed.
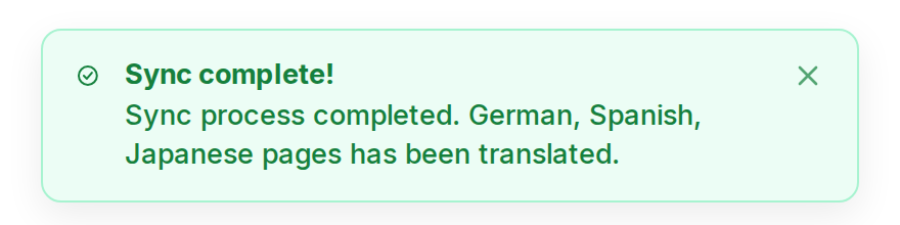
SCREENSHOT 16: The message you see when the sync finishes.
IMPORTANT Save the page, not just the record Saving a record in the Record Manager does not start a sync. Changes reach secondary language pages only after you click Save on the page itself. |
GOOD TO KNOW Synced pages wait for you Sync saves each secondary language page as a draft. Review and publish them when you are ready. See chapter 6. |
CHAPTER 9
9. Sync pages manually
Use Sync Translation for languages set to Manual, or when you want to choose exactly which secondary language pages to update.
- On the primary language page, open the language menu.
- Click Sync Translation.
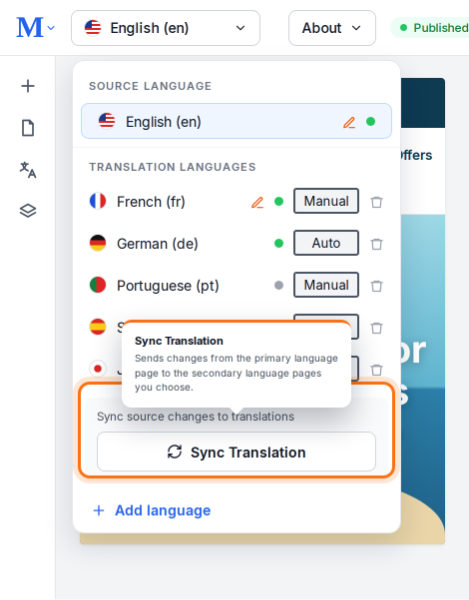
SCREENSHOT 17: Sync Translation in the language menu.
9.1 Choose a sync mode
- Choose Content-Only Sync or Full Override.
- Click Continue.
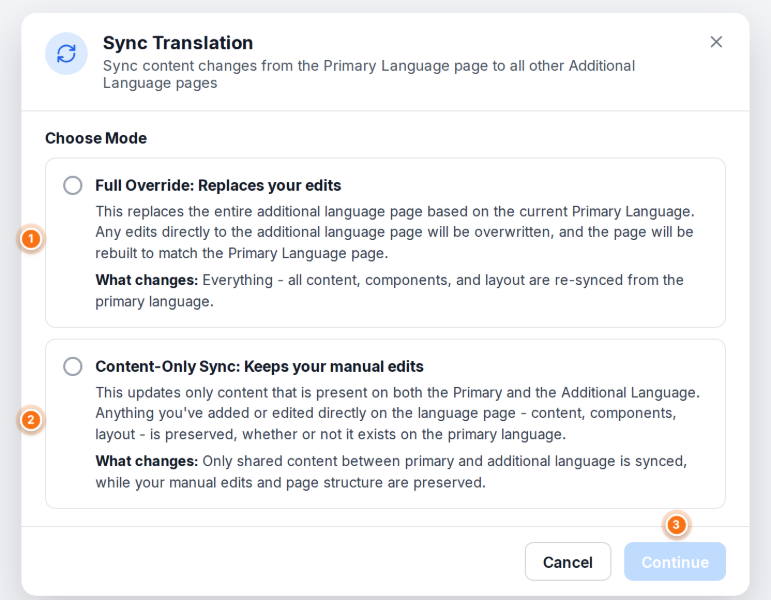
SCREENSHOT 18: The two sync modes.
1 | Full Override. Rebuilds the secondary language page from the primary language page. All local edits are lost. |
2 | Content-Only Sync. Updates only content that exists on both pages. Your local edits, added components and layout stay as they are. Recommended. |
3 | Continue. Moves on to choosing the language pages. |
9.2 Run a Content-Only Sync
- Check the selected languages. Pages marked Out of Sync are selected for you.
- Select any other languages you want, then click Continue.
- Follow progress in the Translation Queue. A Sync complete message appears when it finishes.
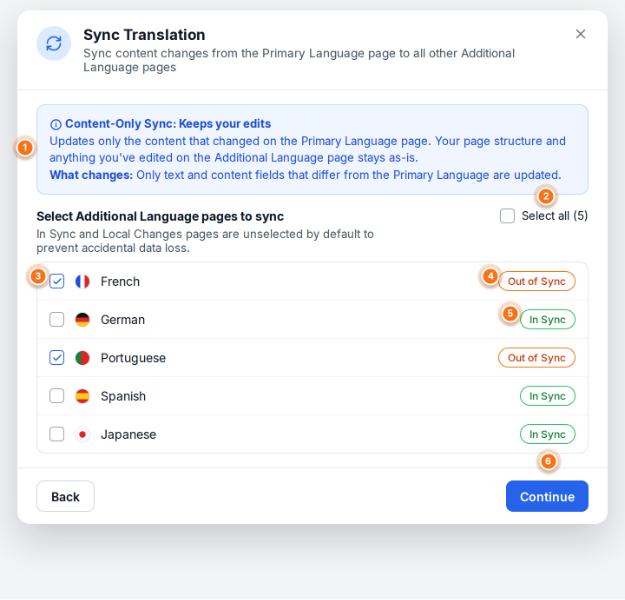
SCREENSHOT 19: Choosing language pages for a Content-Only Sync.
1 | Mode summary. Confirms that your edits will be kept. |
2 | Select all. Selects every secondary language page. |
3 | Language checkbox. Select the pages to sync. |
4 | Out of Sync. The page is missing changes from the primary language page. Selected by default. |
5 | In Sync. The page is already up to date, usually because it is set to Auto. Not selected by default. |
6 | Continue. Starts the sync. |
TIP Why some pages are not selected Pages that are in sync, and pages with local changes, are left unselected so you do not overwrite anything by accident. |
9.3 Run a Full Override
Use Full Override only when you want a secondary language page to match the primary language page exactly, for example when it has no local edits worth keeping and has drifted too far.
- Choose Full Override and click Continue.
- Read the warning, then select the pages to override.
- Click Override and Sync.
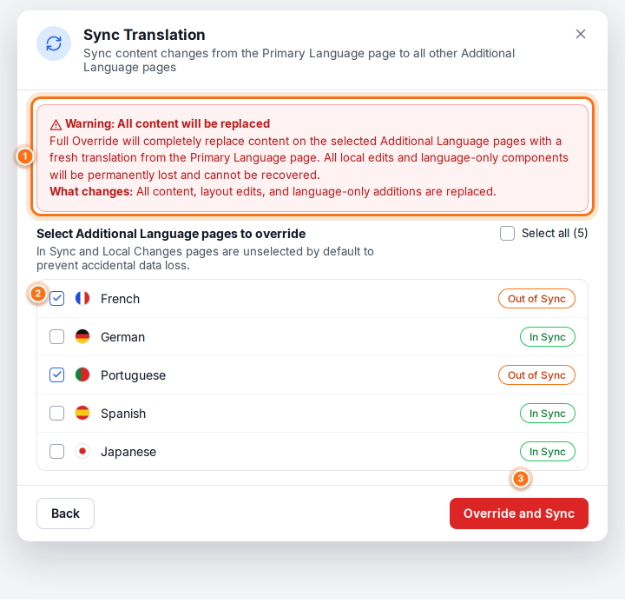
SCREENSHOT 20: The Full Override warning and page selection.
1 | Warning. Everything on the selected pages will be replaced. |
2 | Language checkbox. Select only the pages you want rebuilt. |
3 | Override and Sync. Replaces the selected pages with a fresh translation. |
CAUTION Full Override cannot be undone All local edits and components added only on the selected secondary language pages are permanently lost. Auto-sync never uses Full Override. |
CHAPTER 10
10. Add and remove components
When you add or remove a component on the primary language page, Page Studio asks which secondary language pages should change too. This applies only on the primary language page. A component added on a secondary language page stays on that page only. See section 11.4.
10.1 Add a component
- On the primary language page, click the + icon at the top left.
- Choose a category and click the component you want.
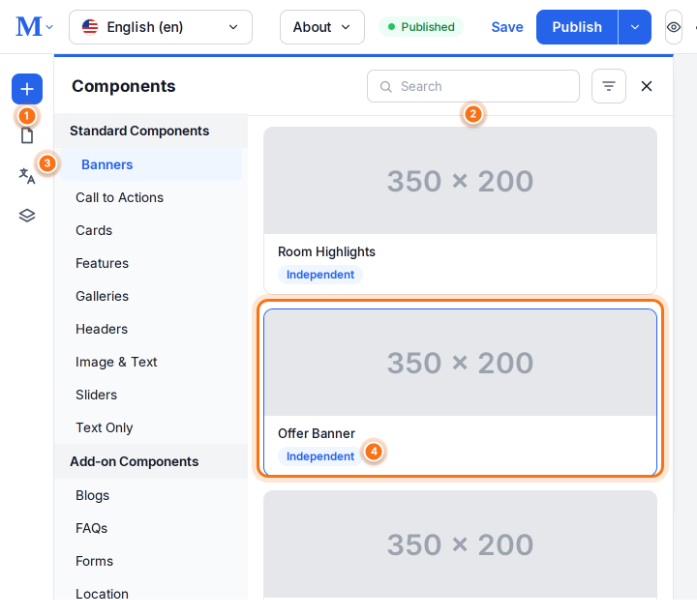
SCREENSHOT 21: The Components panel.
1 | Add component. Opens the Components panel. |
2 | Search. Finds a component by name. |
3 | Categories. Standard and add-on component groups. |
4 | Component card. Click a component to add it. |
- In Add Component to Language Pages, keep the languages that should receive the component and clear the rest.
- Click Add to Source & N Languages, or Skip All Languages to add it to the primary language page only.
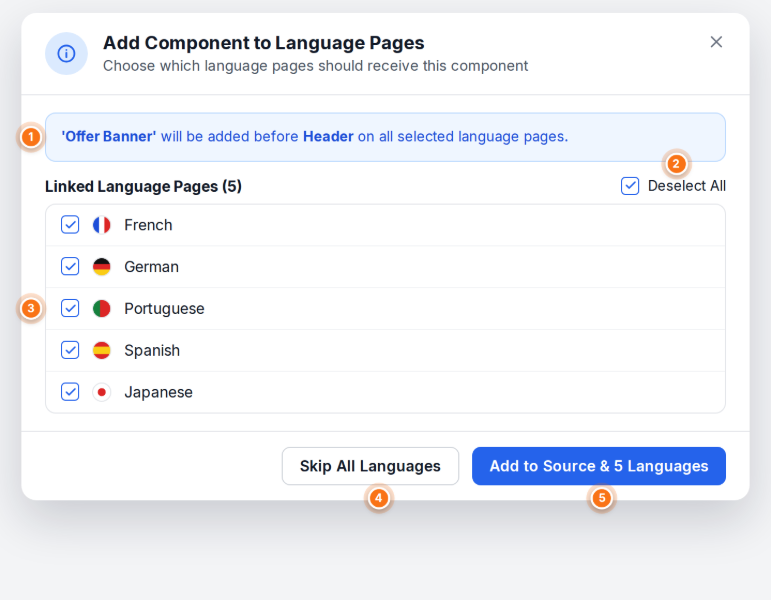
SCREENSHOT 22: Choosing which secondary language pages receive the new component.
1 | Position. Where the component will be placed. It goes in the same position on each secondary language page. |
2 | Deselect All. Clears every language. |
3 | Linked Language Pages. Clear any language that should not get the component. |
4 | Skip All Languages. Adds the component to the primary language page only. |
5 | Add to Source & N Languages. Adds the component to the primary language page and every selected language. |
Page Studio saves the page, refreshes it and starts a sync for languages set to Auto.
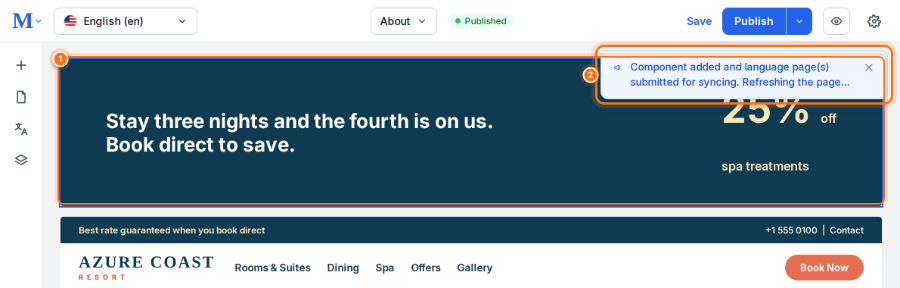
SCREENSHOT 23: The new component is added and the language pages are submitted for syncing.
1 | New component. Added to the primary language page. |
2 | Confirmation. The selected language pages were submitted for syncing and the page refreshes. |
GOOD TO KNOW How placement works The component is placed in the same position as on the primary language page, for example before the header. If Page Studio cannot find that position on a secondary language page, it adds the component at the bottom of the page, and you move it yourself. |
IMPORTANT Skipped and Manual languages A language you skip never gets the component, and Content-Only Sync ignores it. Languages set to Manual still receive the component, but its content is translated only when you run Sync Translation. |
10.2 Remove a component
- On the primary language page, hover over the component and click the three dots.
- Click Delete.
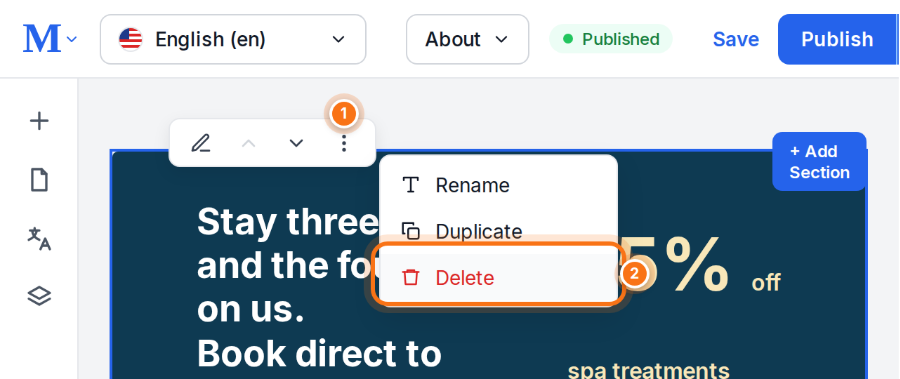
SCREENSHOT 24: Delete in the component menu.
- In Delete component, keep the language pages where the component should also be removed.
- Click Delete from all N pages. The count includes the primary language page.
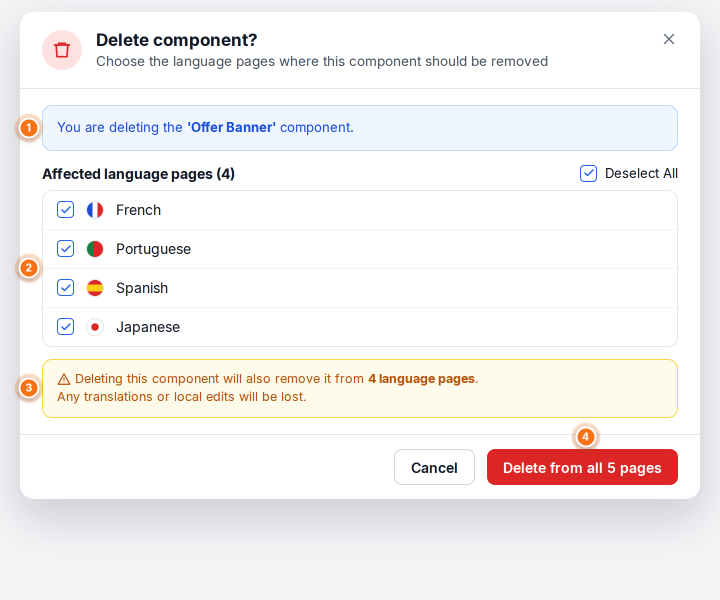
SCREENSHOT 25: Choosing where the component is removed.
1 | Component name. The component you are deleting. |
2 | Affected language pages. Only pages that have this component are listed. |
3 | Warning. Translations and local edits in this component are lost on the selected pages. |
4 | Delete from all N pages. Deletes the component, saves the page and starts a sync. |
CAUTION Deleting removes local edits too Removing a component from a secondary language page also removes any translations and local edits inside it. They cannot be recovered. |
CHAPTER 11
11. Edit secondary language pages locally
Local teams can change any content on a secondary language page to suit their market. These local edits are protected: auto-sync and Content-Only Sync never overwrite them.
11.1 Make a local edit
- Open the secondary language page from the language menu.
- Hover over the component and click Edit.
- Change the fields you need and click Save.
The Record Manager shows how many local edits the record has and adds a Revert link to each edited field.
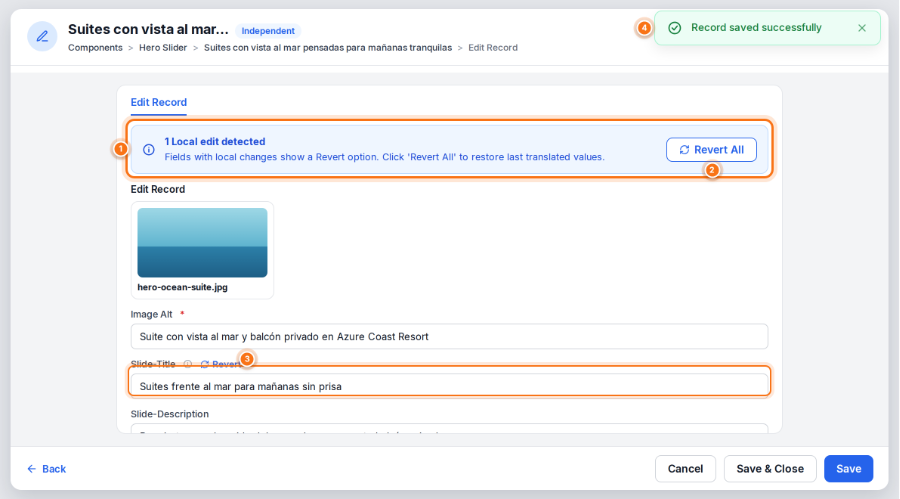
SCREENSHOT 26: A record with one local edit on the Spanish page.
1 | Local edit detected. How many fields in this record were changed on this page. |
2 | Revert All. Restores the latest translation for every edited field in the record. |
3 | Revert. Restores the latest translation for this field only. |
4 | Record saved. Confirms the change. Saving a secondary language page does not start a translation. |
11.2 Find local edits
Local edits are marked in two places so anyone reviewing the page can see what was changed by hand.
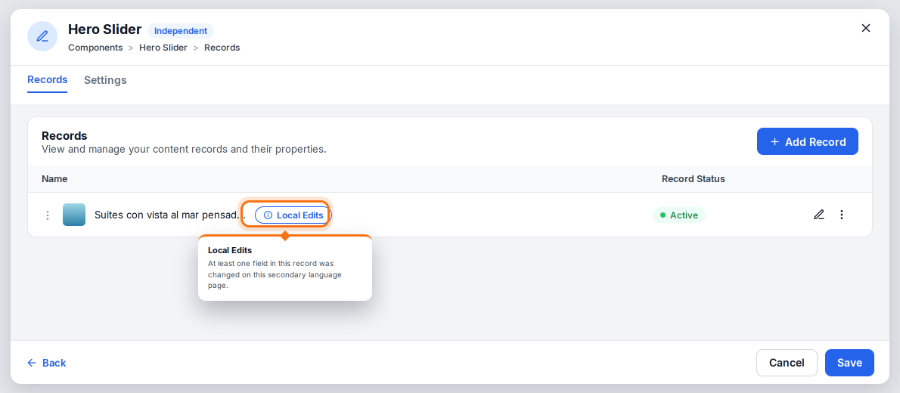
SCREENSHOT 27: The Local Edits badge in the component’s record list.
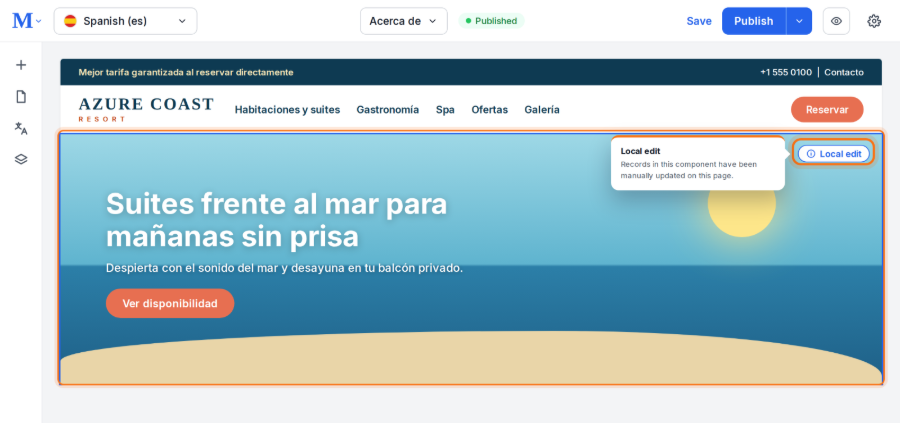
SCREENSHOT 28: The Local edit badge at the top right of the component on the page.
11.3 Undo a local edit
- Open the record in the Record Manager.
- Click Revert next to a field, or Revert All for the whole record.
- Click Save.
GOOD TO KNOW Reverted fields sync again After you revert a field, it shows the latest translation and starts receiving updates from the primary language page again. |
11.4 Components added on a secondary language page
A component you add on a secondary language page exists on that page only. It carries no badge, and syncs never change or remove it.
11.5 What happens to local edits after a sync
In this example, both the Image Alt and the Slide-Title were changed on the English primary language page. On the Spanish page, the Slide-Title had already been edited locally.
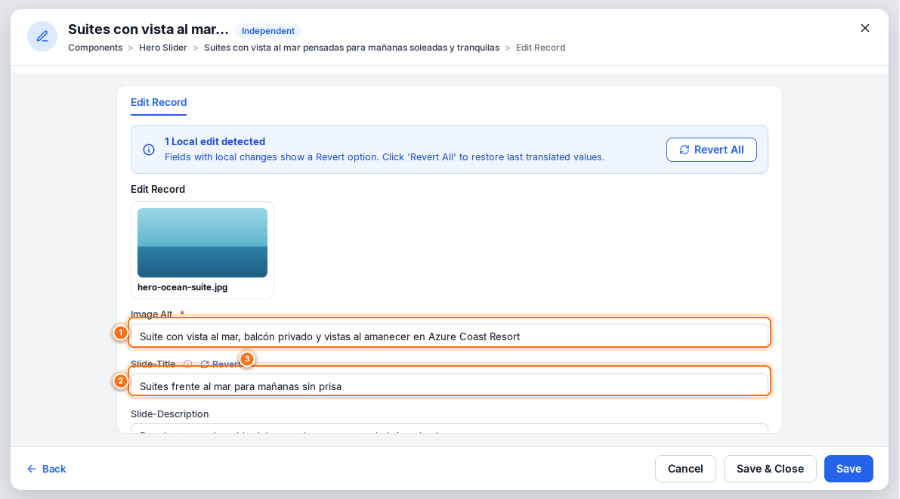
SCREENSHOT 29: The Spanish record after the sync.
1 | Image Alt. Not edited locally, so it received the new translation. |
2 | Slide-Title. Edited locally, so it kept the local text. |
3 | Revert. Still available if you want the latest translation instead. |
IMPORTANT Only Full Override removes local edits Auto-sync and Content-Only Sync always keep local edits. Full Override replaces them. See section 9.3. |
CHAPTER 12
12. If something does not look right
What you see | What to do |
I changed the primary language page but the secondary pages did not update. | Check that you clicked Save on the page, not only Save & Close in the Record Manager. Then check the language is set to Auto, or run Sync Translation. |
A secondary language page shows Out of Sync. | It is set to Manual. Run a Content-Only Sync, see section 9.2. |
The meta title on a secondary language page is out of date. | Meta information is translated only once. Update it on the secondary language page. |
I cannot open a language page from the language menu. | It is being translated. Wait for the job to finish in the Translation Queue. |
A new component landed at the bottom of a secondary language page. | Page Studio could not match its position. Move it with the arrows in the component toolbar. |
A component is missing on one language. | That language was cleared when the component was added. Add the component on that secondary language page directly. |
A job shows Failed in the Translation Queue. | Run Sync Translation again for that language. If it fails again, contact support. |
My local edits disappeared. | A Full Override was run on that page. Local edits cannot be recovered after a Full Override. |
Changes are not on the live site. | Synced pages are drafts. Publish them, see chapter 6. |
12.1 Coming soon
COMING SOON More content types AI Translation is being extended to blogs, dynamic pages and more components. Self-serve translation of a whole site in one go is also on the way. |
A to Z index
A
Add languageSection 4.1
Auto-syncSection 7.2
Auto-sync, how it worksChapter 8
C
Clear allChapter 5
Components, addingSection 10.1
Components, localSection 11.4
Components, removingSection 10.2
Content-Only SyncSection 9.2
Creating statusSection 4.2
D
DeltaChapter 5
DraftSection 3.1
F
Full OverrideSection 9.3
Full pageSection 4.2
G
Gray dotSection 3.1
I
In SyncSection 9.2
L
Language menuChapter 3
Local edit badgeSection 11.2
Local editsSection 11.1
M
Manual syncChapter 9
Meta informationSection 2.2
O
Out of SyncSection 9.2
P
Primary language pageSection 1.3
PublishChapter 6
R
Record ManagerChapter 8
RevertSection 11.3
Revert AllSection 11.3
S
Secondary language pageSection 1.3
Skip All LanguagesSection 10.1
Status dotsSection 3.1
Sync TranslationChapter 9
T
Translation QueueChapter 5
TroubleshootingChapter 12
Was this article helpful?
That’s Great!
Thank you for your feedback
Sorry! We couldn't be helpful
Thank you for your feedback
Feedback sent
We appreciate your effort and will try to fix the article