

Knowledge base
Export and Import in the CMS - User Guide
Move Formats, CSS files, JS files, MiBlocks and whole Components from one site to another, and see exactly what will change before anything is saved. The examples follow the usual path: build and test on your Staging site, then move the change to Production. Screenshots use sample data.
On this page
- Moving changes from Staging to Production
- Overview
- Export Formats, CSS and JS
- Import Formats
- Import CSS and JS files
- Export and import MiBlocks
- Export and import Components
- Activity Log
- FAQs
HOW TO READ THE SCREENSHOTS The orange numbers on a screenshot match the numbered list under it. The orange outline marks the main action for that step. A white card gives a short tip. You can search the whole guide with Ctrl+F or Cmd+F. |
Moving changes from Staging to Production
Build and test on your Staging site first. When it is ready, export it from Staging and import the file to Production. Nothing is saved on Production until you review the changes and click import.
Export and import work between any two Milestone sites, for example from Production back to Staging. This guide uses Staging to Production because it is the most common path.
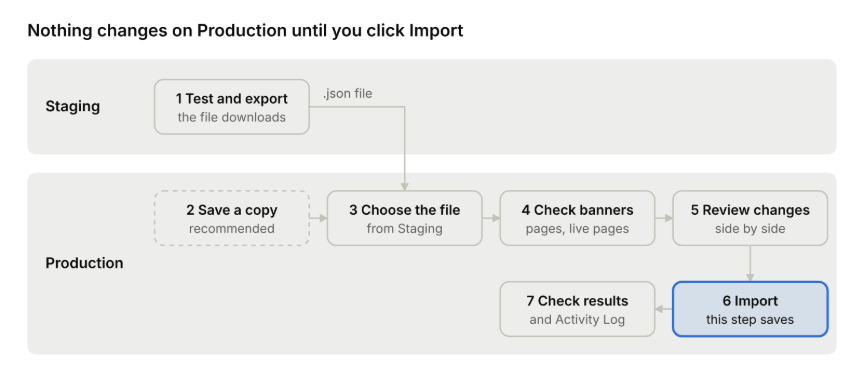
Note: Staging to Production · There are 7 steps, only step 6 saves.
Steps 2 to 5 only read and compare; step 6 is the only one that writes to Production.
What do you want to move?
You built or changed | Export this | What happens on Production |
A brand-new component | The component | Everything in it is created: the component, its Format, MiBlocks, CSS and JS |
An existing component (its Format, MiBlocks, CSS or JS) | The component | Changed items are updated, new items are created, the rest show No change |
Only a Format | The Format | The Format is updated or added |
Only a CSS or JS file | The CSS or JS file | The file is updated or added |
A MiBlock (its fields or settings) | The MiBlock | The MiBlock and all its sub-MiBlocks are updated or added |
Tip: if you changed several parts of one component, export the component. It carries every linked item in one file, so nothing is missed.
The steps
- On Staging: test your change, then export it. A .json file downloads to your computer.
- On Production (recommended): if you are changing items that already exist, export them from Production first. Keep this file as your copy of what is live today.
- On Production: open the import screen for the same type and choose the file from step 1.
- Check the banners: how many pages will change, how many of them are live, and whether there are legacy editor pages.
- Review each changed row: compare what is on Production with what is in the file. For items that already exist, choose Update or New.
- Import: click Import Selected or Import All.
- Check: read the result, open the Activity Log, and look at the changed pages, including legacy editor pages.
How it keeps Production safe
Safeguard | How it protects Production |
Nothing saved until you import | Checking a file changes nothing. |
Side-by-side review | You see every difference before you import. |
Impact counts | You see how many pages, and how many live pages, will change. |
Content stays put | Only structure and settings move. Your content (records) never moves. |
Audit trail | Every export and import is logged with the date, time, user, file and one line per item. |
Your own copy | There is no undo. If you need to go back, import the copy you saved in step 2. |
Example scenarios in this guide
- A brand-new component: Example A in Export and import Components.
- An existing component with Format, MiBlock, CSS and JS changes: Example B in Export and import Components.
- A single Format, CSS, JS or MiBlock fix: the section for that type below.
Overview
Export items from one site, import the file on another, and review every change before you confirm.
You can move | Export | Import |
Formats | Yes | Yes, with review |
CSS files | Yes | Yes, with review |
JS files | Yes | Yes, with review |
MiBlocks (with all sub-MiBlocks) | Yes | Yes, with review |
Components (with their Format, MiBlocks, CSS and JS) | Yes, without data | Yes, with review |
Key fact | Details |
Who can use it | Users with the Programmer or Advanced Programmer role. |
What can be imported/exported | Structure and settings only. Data records (your content) are never exported or imported. |
Limits | One file can hold up to 10 items and be up to 5 MB. Components can be exported and imported only one at a time where the 10 items limit is for Format, CSS, JS and MiBlock individual export/import. |
Typical use | Build and test on your staging site, export, then import the file on your live site. |
Important: an import writes to the site straight away and can't be undone. Always review before you import.
Export Formats, CSS and JS (on Staging)
On the site you are moving from (usually Staging), tick the items in the list and click Export; a .json file downloads to your computer.
- Go to Manage Layout and open Formats, CSS or JS.
- Tick the items you want to move.
- Click Export in the toolbar.
- Your browser saves the file (for example cms-export-format-…json). An Export ready message appears in the top-right corner with the number of items and the file name.
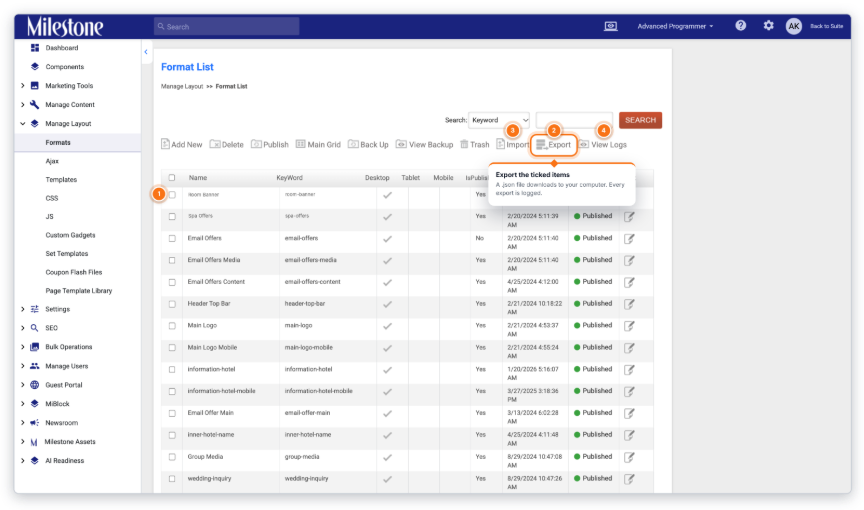
The Import, Export and View Logs buttons sit in the toolbar of each list.
1 | Tick the items. Choose the Formats you want to move. |
2 | Export. Downloads the ticked items as one .json file. |
3 | Import. Opens the import screen on the site you are moving to. |
4 | View Logs. Opens the Activity Log for Formats. |
Every export is recorded in the Activity Log. MiBlock export has its own steps, see Export and import MiBlocks below.
Import Formats (on Production)
On the site you are moving to (usually Production), choose the file, check what will change, review, then confirm. Formats are matched to your site by Format Key. CSS and JS use the same screen (see the next section).
Step 1 — Choose the file
On the Format List, click Import. Click Choose File or drop the .json file into the box. The file is checked against your site straight away; nothing is saved until you import.
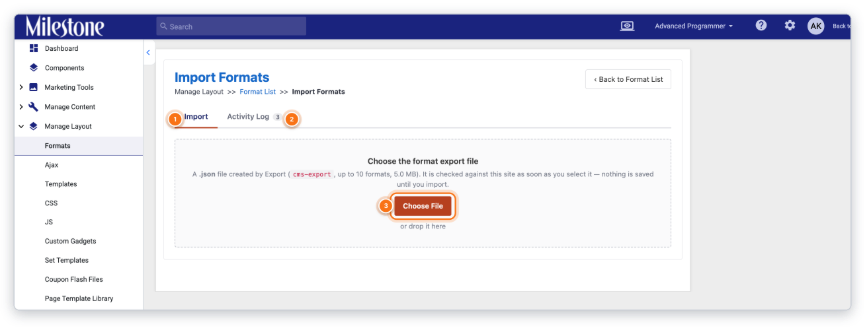
Choosing a file only checks it. Nothing is saved yet.
1 | Import tab. Where you choose and check the file. |
2 | Activity Log. Every import and export on this site. |
3 | Choose File. Pick the .json file. It is checked straight away; nothing is saved yet. |
Step 2 — See what the file contains
A File checked message shows how many items are new, already on your site, or the same as your site.
Banner | What it means |
Green — "Nothing on this site is replaced" | The import only adds new items, or everything is already the same. |
Yellow — "1 format will be replaced" | Updates go straight to live and can't be rolled back. |
Blue — legacy editor note | Your site has pages built in the legacy editor. Their impact can't be checked, so look at them after the import. |
When nothing changes, every row shows No change and the import buttons
Both formats show No change, so the import buttons stay disabled.
When something changes, the row shows what differs:
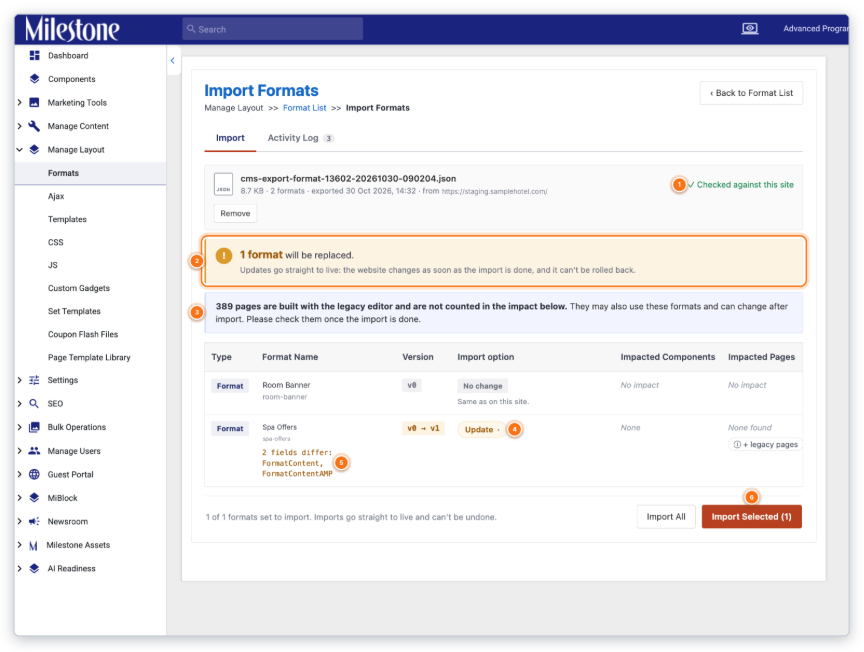
The yellow banner and the row show what will be replaced.
1 | Checked against this site. The file has been compared with this site. |
2 | Yellow banner. How many items will be replaced. Updates go live straight away. |
3 | Blue note. Pages built in the legacy editor are not in the counts. Check them after the import. |
4 | Update. This Format exists on the site and will be replaced. |
5 | Fields that differ. Which parts of the Format changed. |
6 | Import Selected. Imports only the ticked rows. |
Step 3 — Read the table
The table is wide; scroll right to see Review and Upload.
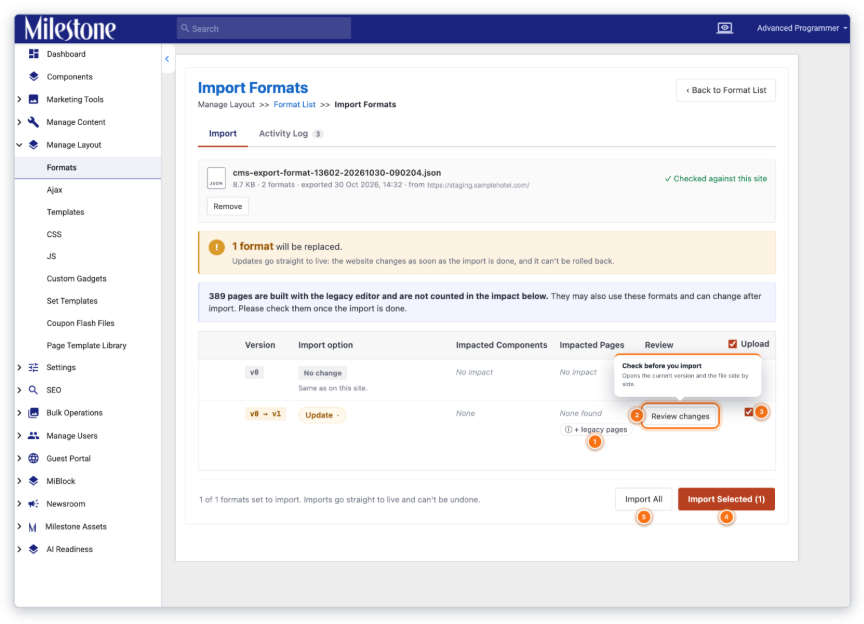
Scroll right to reach Review changes and Upload.
1 | + legacy pages. Legacy editor pages may also use this item. |
2 | Review changes. Compare the current version with the file. |
3 | Upload. Ticked rows are imported. Untick to leave a row out. |
4 | Import Selected. Imports only the ticked rows. |
5 | Import All. Imports every row that has a change. |
Column | What it tells you |
Type | Format, CSS or JS |
Format Name | The name, its key, and which fields differ (for example "2 fields differ: FormatContent, FormatContentAMP") |
Version | The version on your site and the one it becomes (for example v0 → v1) |
Import option | Update replaces the item on your site. No change means it is the same as your site. |
Impacted Components | How many components use this item. Hover to see them. |
Impacted Pages | How many pages use it and how many are live. Hover to see them. + legacy pages appears when legacy editor pages may also use it. |
Review | Review changes opens a side-by-side comparison |
Upload | Ticked rows are imported. Use the header box to tick all. |
Step 4 — Review the changes
Click Review changes to compare the current version (left) with the file (right). Removed lines are red, added lines are green. A note explains which settings Update keeps (for example the site's IsPublished flag). Click Upload this format to include it, Don't upload to leave it out, or Close.
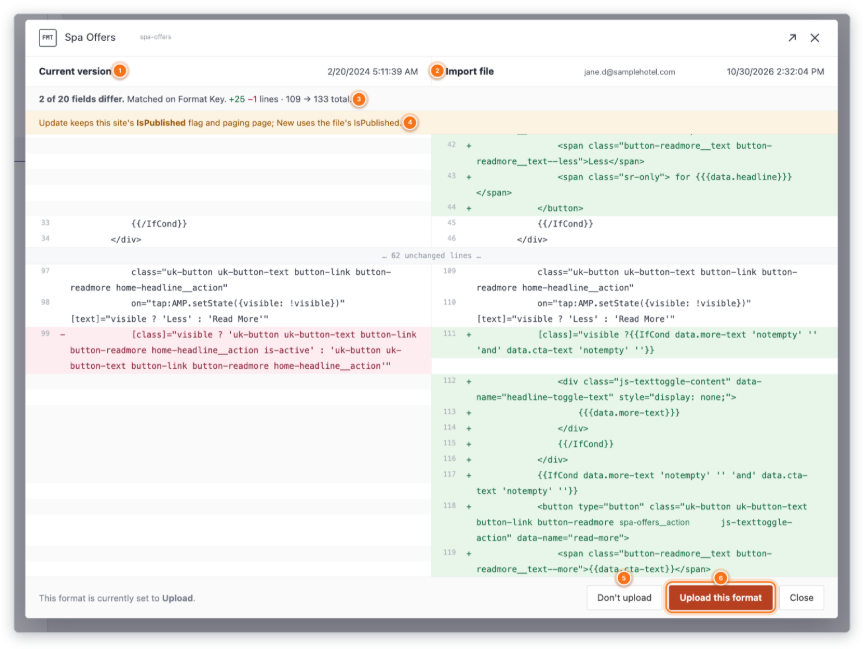
Left: what is on the site now. Right: what is in the file.
1 | Current version. What is on this site now (left). |
2 | Import file. What is in the file (right). |
3 | Summary. How many fields and lines differ. |
4 | Note. What Update keeps from this site, for example IsPublished. |
5 | Don't upload. Leaves this Format out of the import. |
6 | Upload this format. Includes it and ticks Upload in the table. |
Step 5 — Import
- Import Selected (n) imports only the ticked rows.
- Import All imports every row that has a change.
A confirmation lists what will happen and reminds you that it writes to the live site straight away. Click Import now to go ahead or Cancel to go back.
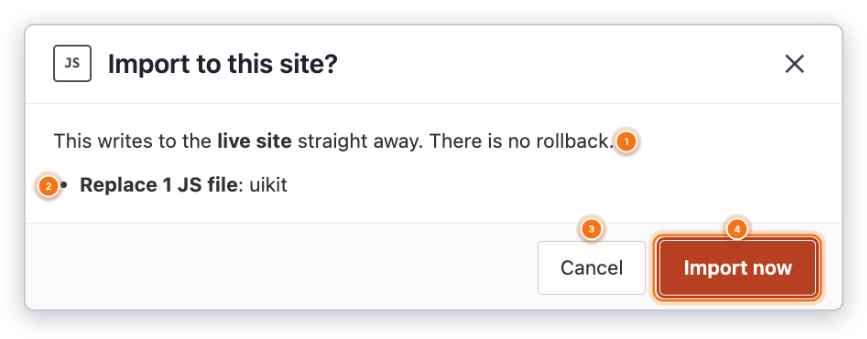
This is the last check before anything is saved.
1 | Warning. The import writes to the live site straight away. |
2 | What will happen. The items that will be replaced or added. |
3 | Cancel. Go back without importing. |
4 | Import now. Runs the import. |
Step 6 — Check the result
A green banner shows Import finished with the counts (for example "1 replaced"), the log entry number, and links to See the activity log or Import another file. An Import successful message also appears in the top-right corner.

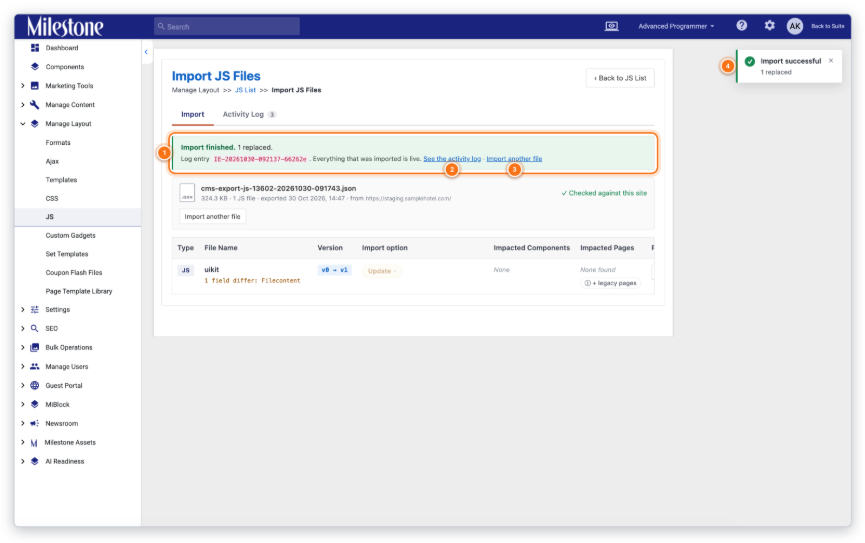
The counts, the log entry and the next actions.
1 | Import finished. The counts and the log entry number. |
2 | See the activity log. Opens the log entry for this import. |
3 | Import another file. Start again with a new file. |
4 | Import successful. A message in the top-right corner confirms it. |
Leaving the screen
If you click Back to JS List before importing, you are asked to confirm, because the checked file will be cleared.
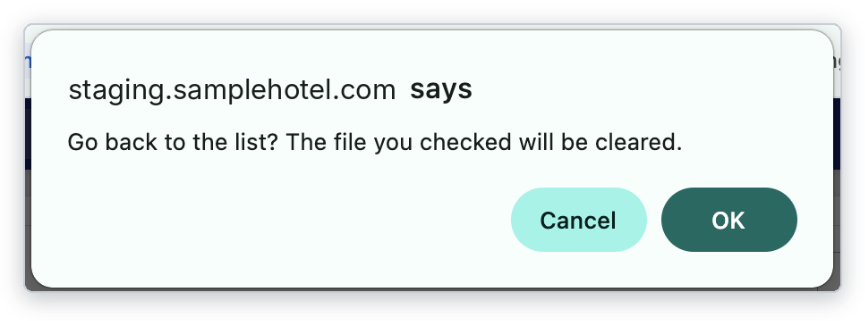
Shown if you leave before importing.
Import CSS and JS files (on Production)
CSS and JS files use exactly the same steps as Formats; only the names on the screens change. Files are matched to your site by file name, and Review changes shows the whole file side by side.
Open Manage Layout > CSS or Manage Layout > JS. The Import, Export and View Logs buttons are in the toolbar.
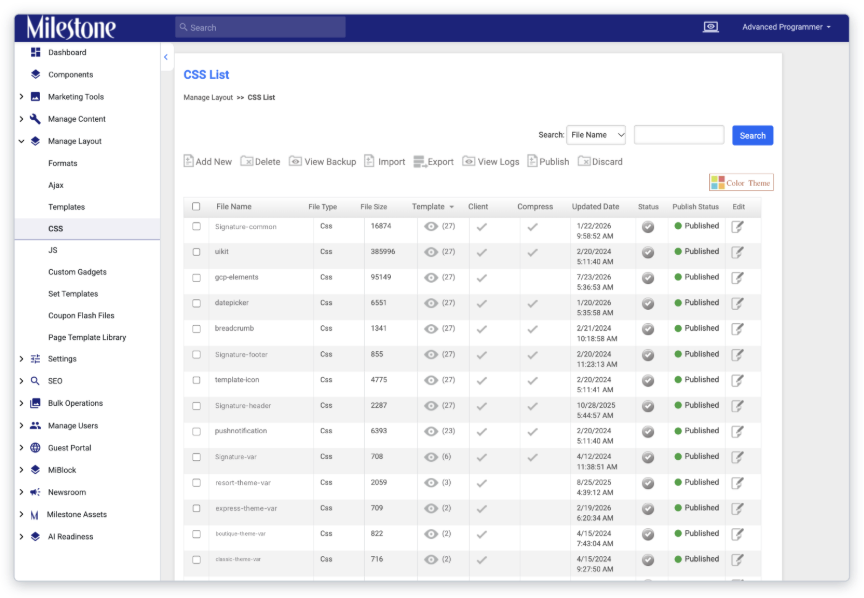
CSS list toolbar.
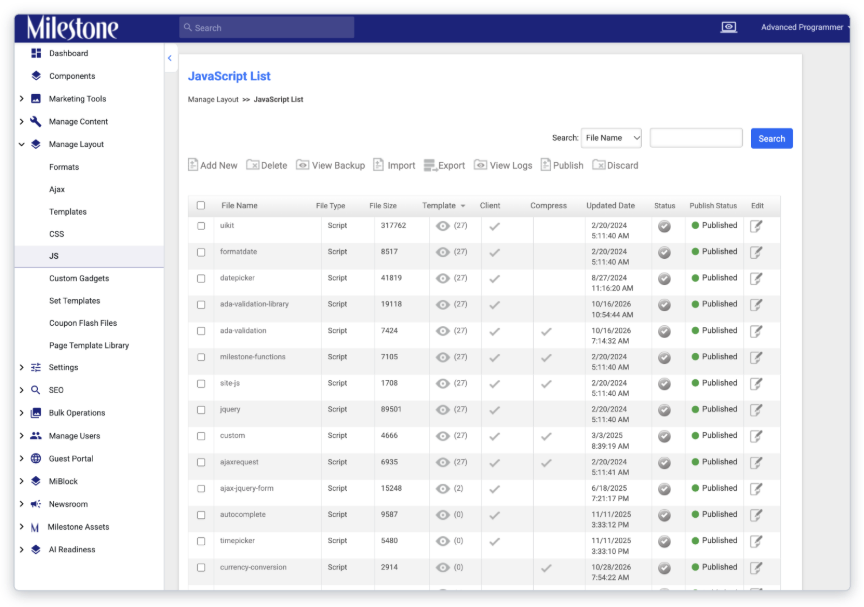
JS list toolbar.
Click Import to open the import screen, then follow Steps 1–6 above.
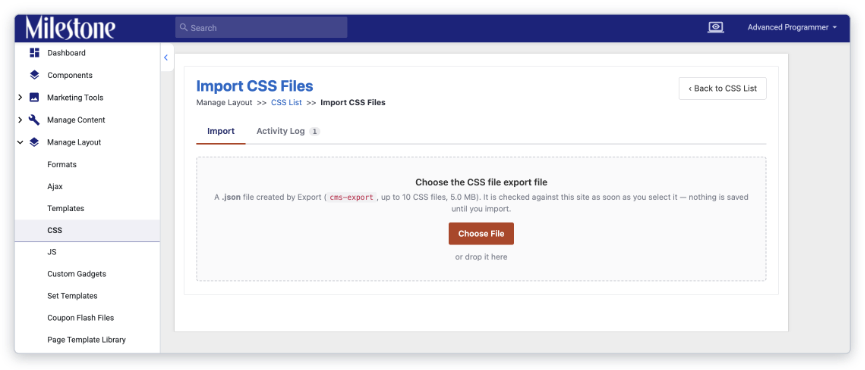
The CSS import screen. The JS screen looks the same.
Export and import MiBlocks
A MiBlock always moves with all its sub-MiBlocks, so each MiBlock is one row with its tree inside it.
Export MiBlocks (on Staging)
- Go to MiBlock > MiBlocks on Staging, tick the MiBlocks you want to move, and click Export.
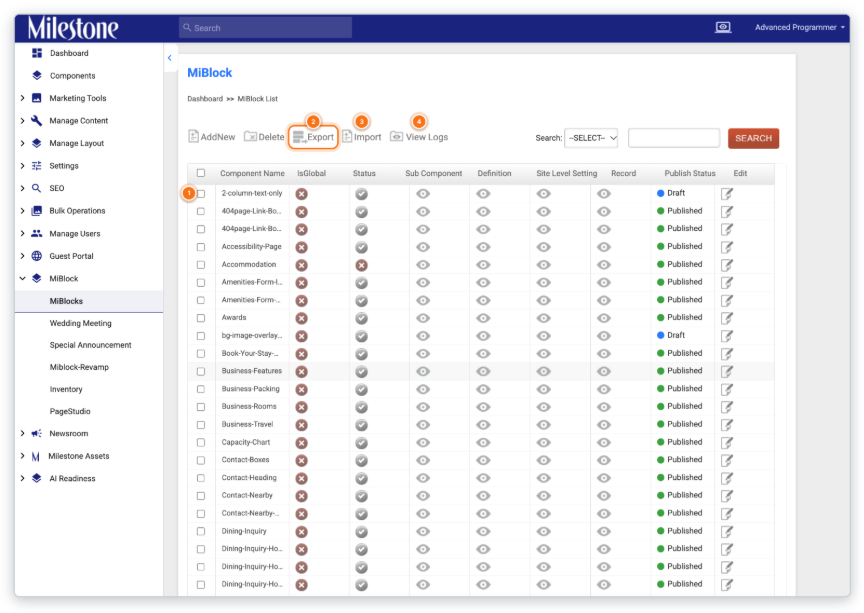
Tick the MiBlocks, then click Export.
1 | Tick the MiBlocks. Choose the MiBlocks to move. Sub-MiBlocks go with them. |
2 | Export. Opens the Export MiBlock bundle window. |
3 | Import. Opens the import screen. |
4 | View Logs. Opens the Activity Log for MiBlocks. |
- The Export MiBlock bundle window shows what you selected, what is included (Details, Configuration, Json-LD, Definition fields, Site-Level Settings and all nested sub-MiBlocks), what is left out (records), and the file name. Click Download bundle.
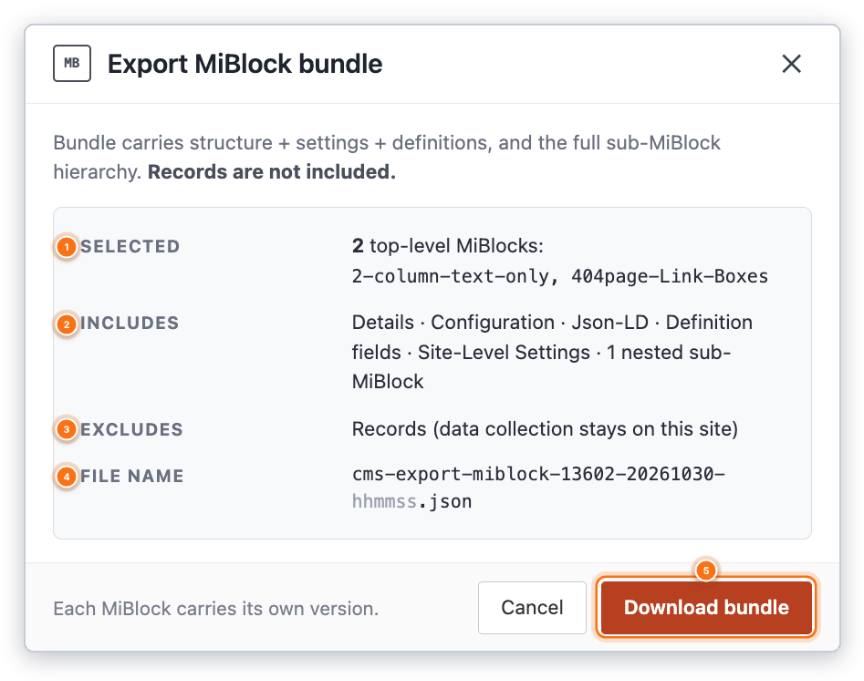
What is included, and what is left out (records).
1 | Selected. The MiBlocks you ticked. |
2 | Includes. Settings, definitions and every nested sub-MiBlock. |
3 | Excludes. Records. Your content stays on this site. |
4 | File name. The name of the .json file that downloads. |
5 | Download bundle. Saves the file to your computer. |
- Your browser saves the file, and an Export ready message appears in the top-right corner.
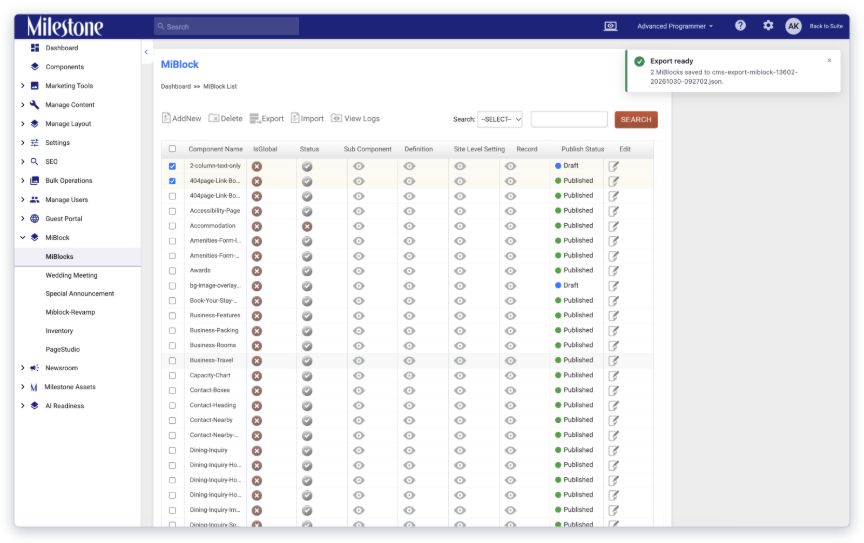
The file is saved to your computer.
Import MiBlocks (on Production)
Step 1 — Choose the file
On Production, open the MiBlock list and click Import, then Choose File or drop the file into the box.
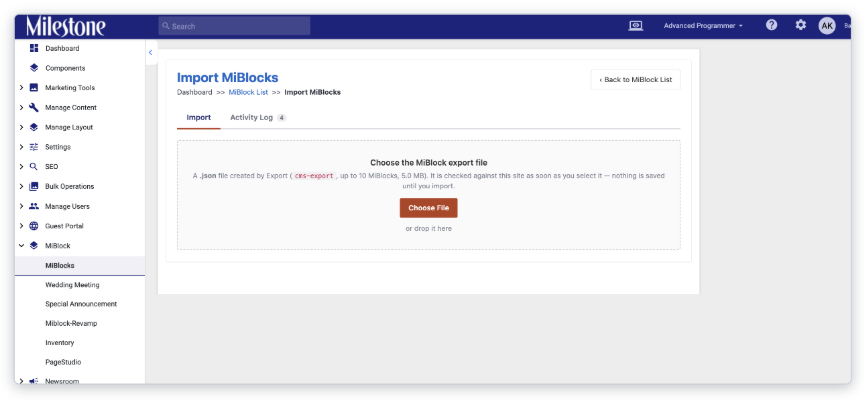
Choosing a file only checks it. Nothing is saved yet.
Step 2 — See what the file contains
- As with Formats, a green banner means nothing on your site is replaced.
- A yellow banner shows how many pages will change and how many are live.
- The Also import site-level settings box (on by default) brings in max records, format and resource type from the file. Untick it to keep your site's own.
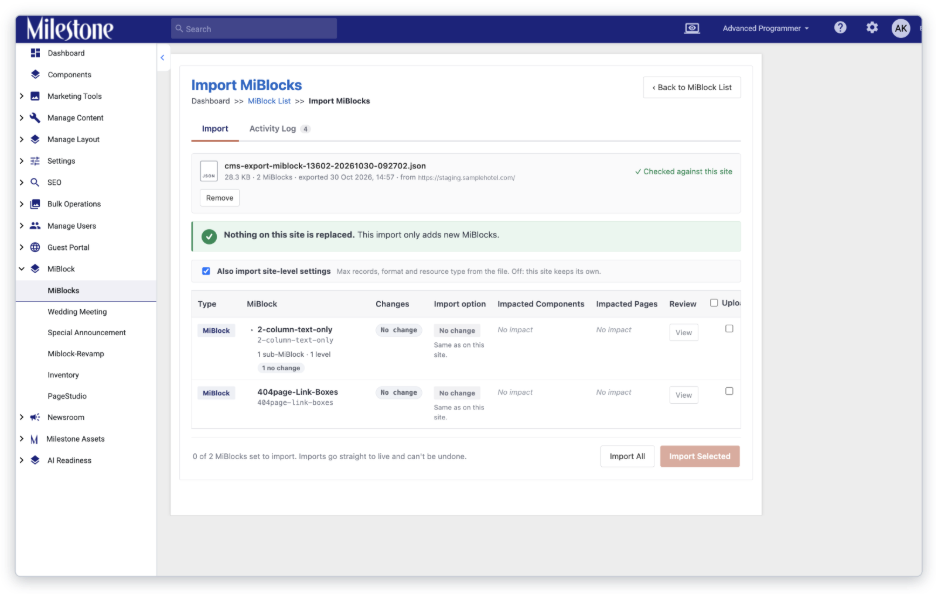
No change: there is nothing to import.
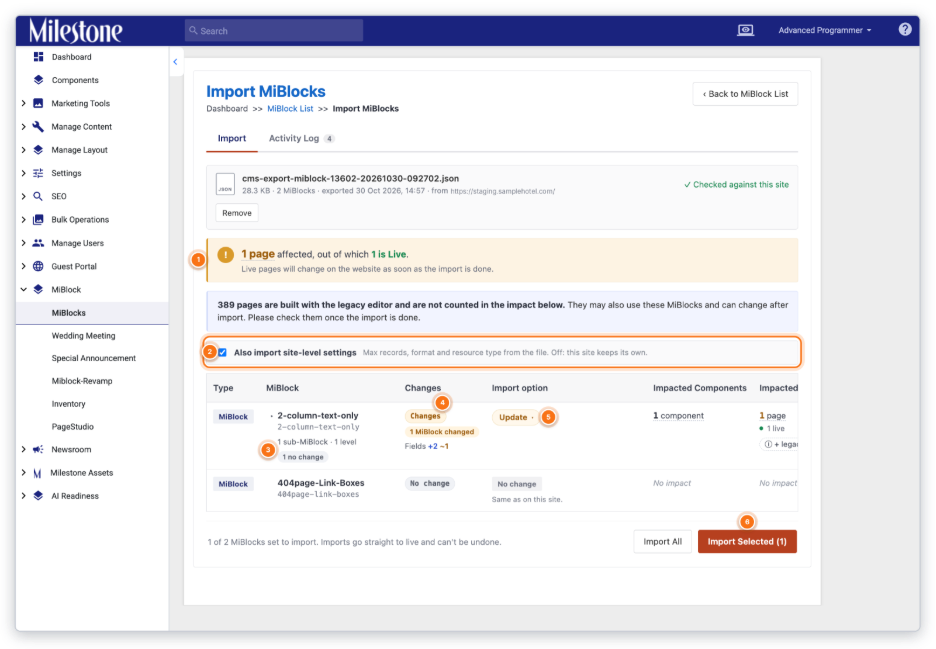
One MiBlock changed: the yellow banner shows the pages affected.
1 | Yellow banner. How many pages change, and how many are live. |
2 | Also import site-level settings. On by default. Untick to keep this site's settings. |
3 | Sub-MiBlocks. The tree that moves with this MiBlock. |
4 | Changes. What differs, for example 2 fields added, 1 changed. |
5 | Update. Replaces the MiBlock on this site. |
6 | Import Selected. Imports only the ticked rows. |
Step 3 — Read the table
- Each MiBlock shows its name, alias and a summary of its sub-MiBlocks, for example "1 sub-MiBlock · 1 level · 1 no change".
- The Changes column shows what differs, for example "1 MiBlock changed · Fields +2 ~1" (2 fields added, 1 changed).
- Impacted Components, Impacted Pages, Review and Upload work as for Formats. Scroll right to see them.
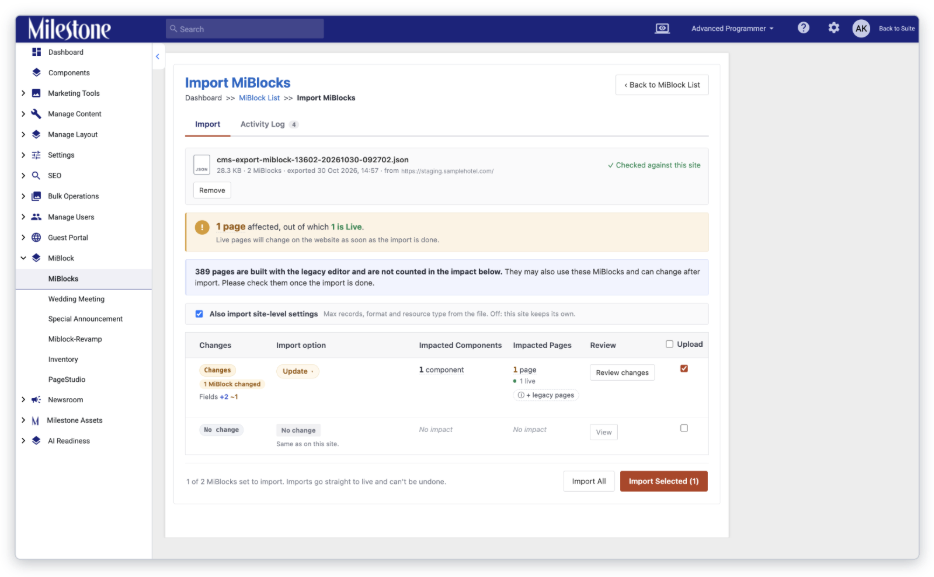
Review changes and Upload are on the right.
Step 4 — Review the changes
Click Review changes (or View on an unchanged row). The MiBlock tree on the left lets you move between the MiBlock and its sub-MiBlocks.
- Fields lists every field with its alias, type and change: Changed, New or Same. What differs shows the old value struck out and the new value.
- Settings, Field tabs and Site-level settings show each value On this site next to In the file.
- Tick Show only changes to hide what is the same. Sub-MiBlocks have Settings, Fields and Field tabs.
- Click Close when done. Use the Upload box in the table to include or leave out a MiBlock.
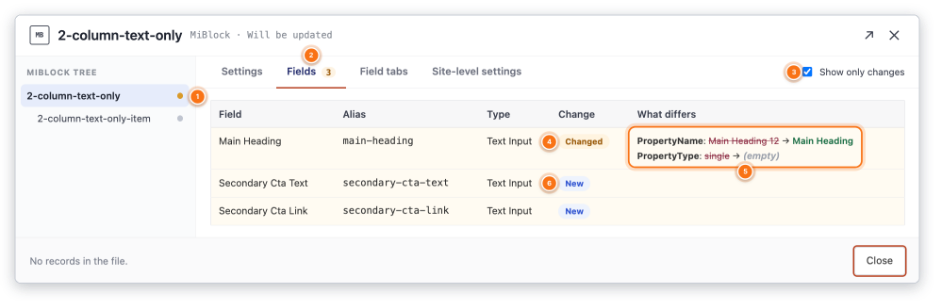
Fields: the old value struck out, the new value next to it.
1 | MiBlock tree. Switch between the MiBlock and its sub-MiBlocks. |
2 | Fields. Every field with its alias, type and change. |
3 | Show only changes. Hides fields that are the same. |
4 | Changed. This field is different in the file. |
5 | What differs. The old value struck out, then the new value. |
6 | New. This field is new in the file. |
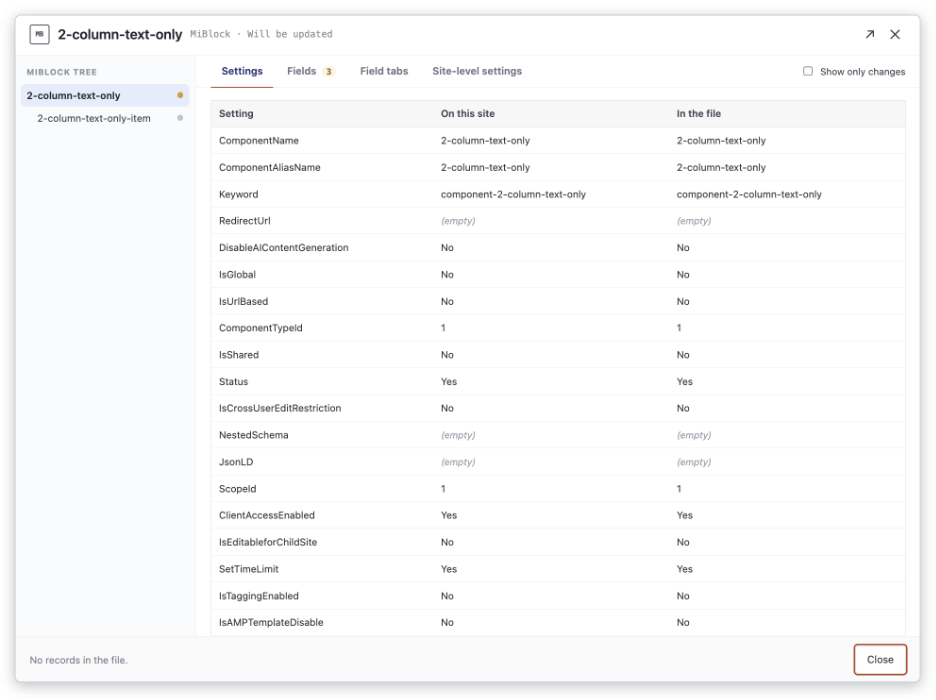
Settings: on this site, next to in the file.
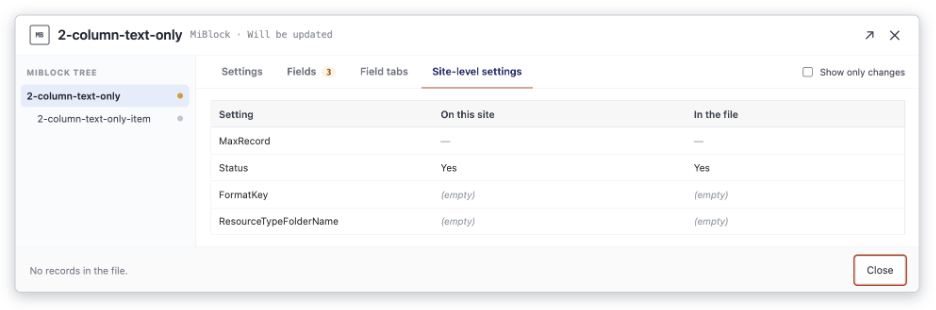
Site-level settings from the file.
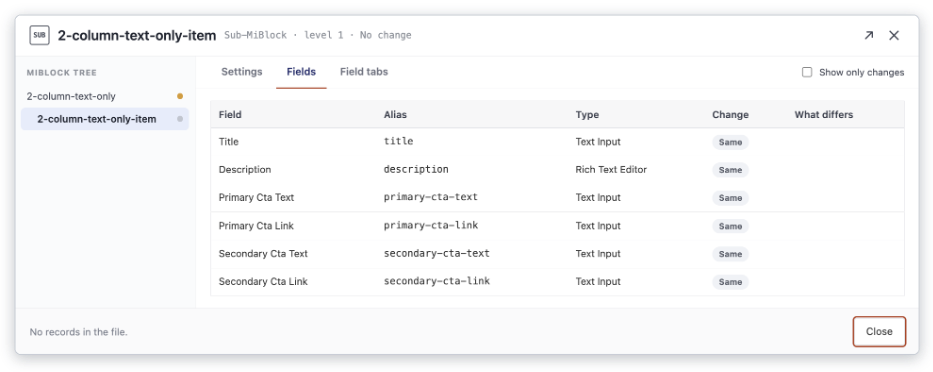
Use the tree to open a sub-MiBlock.
Step 5 — Import
Click Import Selected or Import All. The confirmation lists:
- what will be replaced and what is left out
- how many pages, and live pages, will change
- whether site-level settings are imported
Click Import now to go ahead.
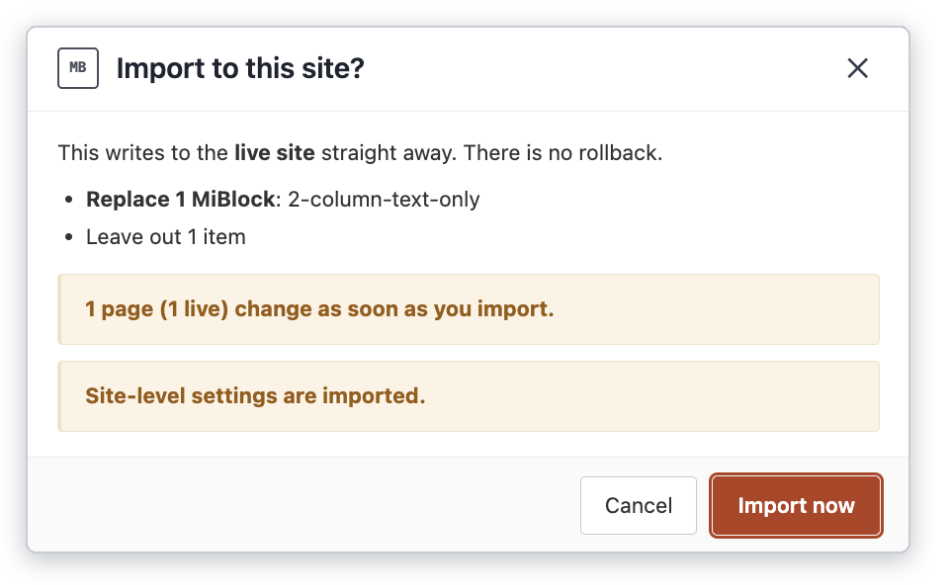
The last check before anything is saved.
Step 6 — Check the result
- The green banner shows the counts, for example "1 replaced, 1 already up to date".
- Each updated MiBlock shows what changed, for example "2 fields added, 1 fields updated".
- Hover over the component count to see which components use it.
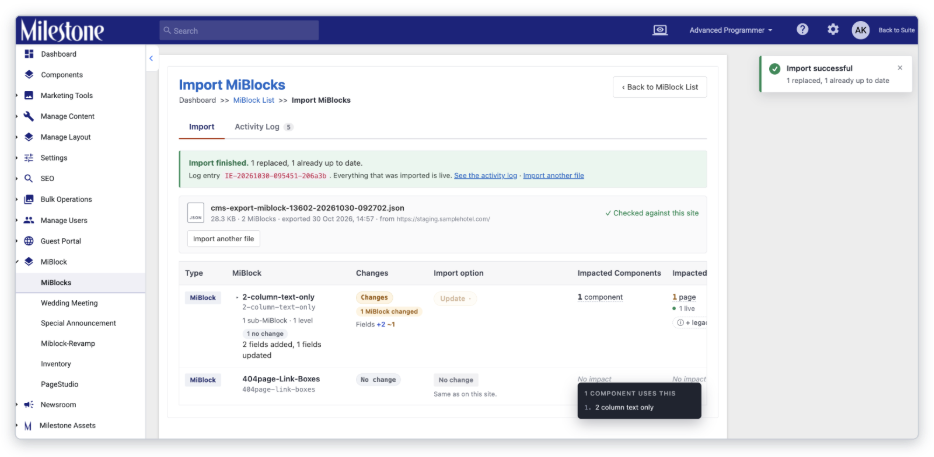
The counts, and what changed in each MiBlock.
Note: as with Formats, going back to the list before importing asks you to confirm, because the checked file will be cleared.
Export and import Components
A component moves as one bundle: the component and every item it uses (its Format, MiBlocks with their sub-MiBlocks, CSS and JS). Records are not included. The examples below follow two components from Staging to Production:
Example | What it shows |
A — Room Offers Carousel | A brand-new component. Nothing in it exists on Production yet. |
B — Dining Menu | Already on Production. On Staging, its Format, a MiBlock, a CSS file and a JS file were changed, and a new MiBlock and a new CSS file were added. |
Export a component (on Staging)
- Go to Components. Click ⋮ on the component's row and choose Export.
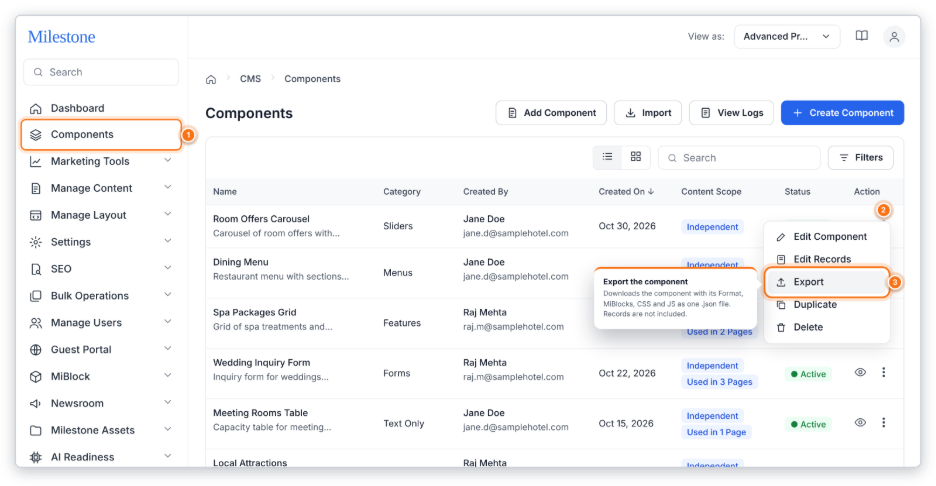
On Staging: the row menu of Room Offers Carousel.
1 | Components. Opens the list of components on Staging. |
2 | Row menu. Opens the actions for that component. |
3 | Export. Downloads the bundle straight away. There is no confirmation window. |
- The file downloads straight away; there is no confirmation window. A message confirms the export, for example "Room Offers Carousel exported with all linked assets." The file name looks like cms-export-vcomponent-room-offers-carousel-…json.
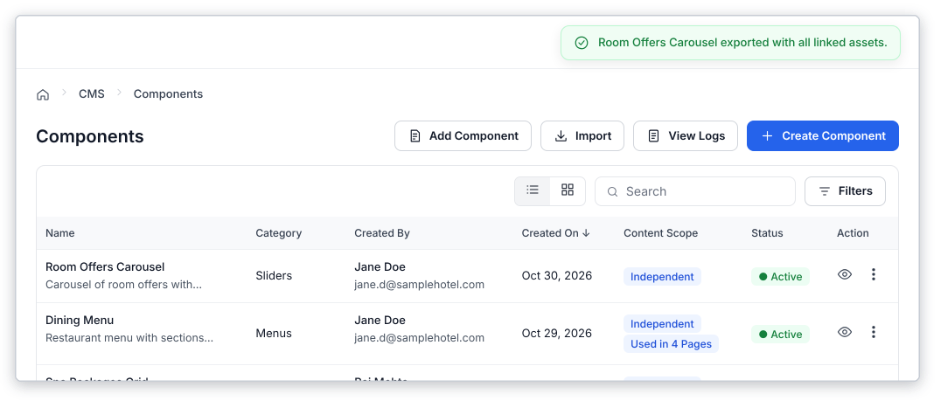
The export is done; there is no confirmation window.
Import a component (on Production)
Step 1 — Choose the bundle
Go to Components and click Import. Click Choose File and pick the .json file. The bundle is checked straight away; nothing is saved yet.
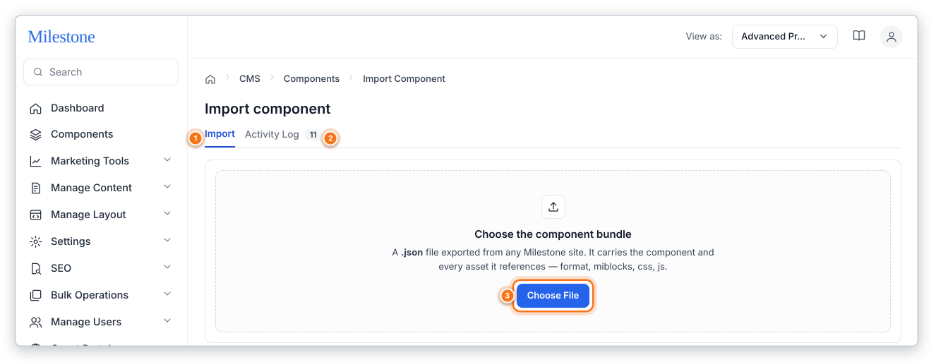
On Production: choosing a file only checks it.
1 | Import tab. Where you choose and check the bundle on Production. |
2 | Activity Log. Every component import and export on this site. |
3 | Choose File. Pick the .json bundle. It is checked straight away; nothing is saved yet. |
Step 2 — See what the bundle contains
The file card shows the file name, size, what is inside (for example "1 component + 1 format + 2 MiBlocks + 1 css + 1 js") and the export date. Click Remove file to start again.
Banner | What it means |
Green — "No pages affected" | Nothing already on Production will be updated. |
Yellow — for example "14 pages will change, 9 of them are live" | Some items will update what is already on Production. |
Blue — legacy editor note | Production has pages built in the legacy editor. They are not in the counts, so check them after the import. |
Example A — a brand-new component. Every row shows Create: the item is not on Production, so it is added with the component. New items are always added; they don't need a tick.
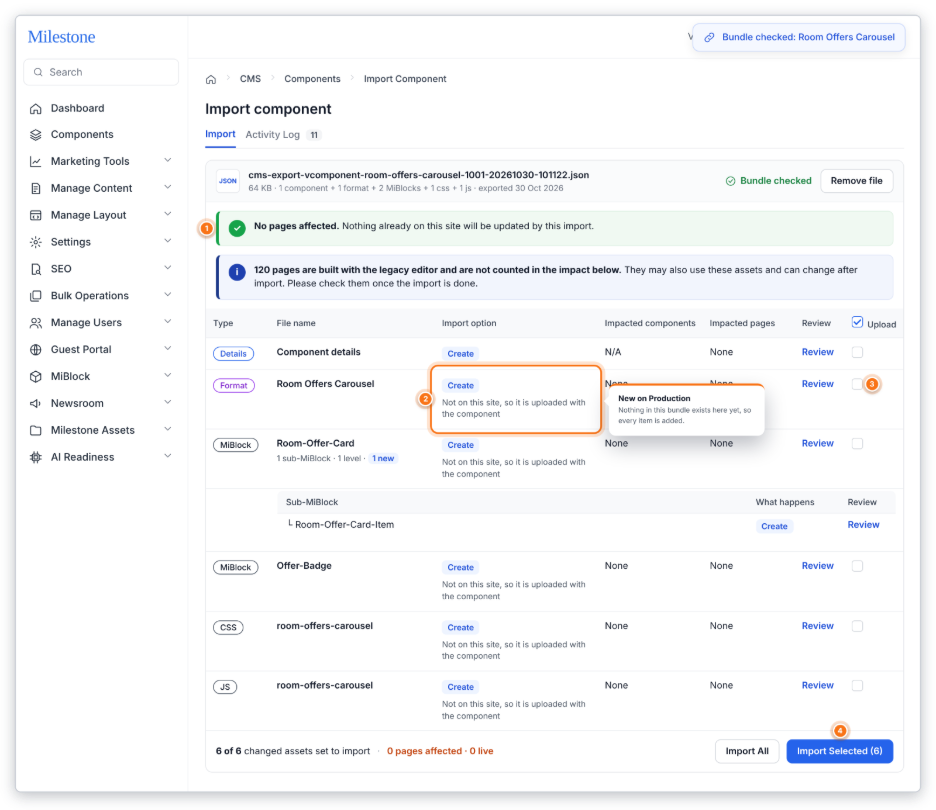
Example A: every row shows Create and the green banner shows no pages affected.
1 | Green banner. Nothing already on Production will be updated. |
2 | Create. The item is not on Production, so it is added with the component. |
3 | Upload. New items are always added; they need no tick. |
4 | Import Selected (6). Adds all six items. |
Example B — a changed component. Items already on Production show Update, new items show Create, and items that are the same show No change. Because 4 items already exist, the Set all to Update / New bar lets you choose for all of them at once. You can still change any row.
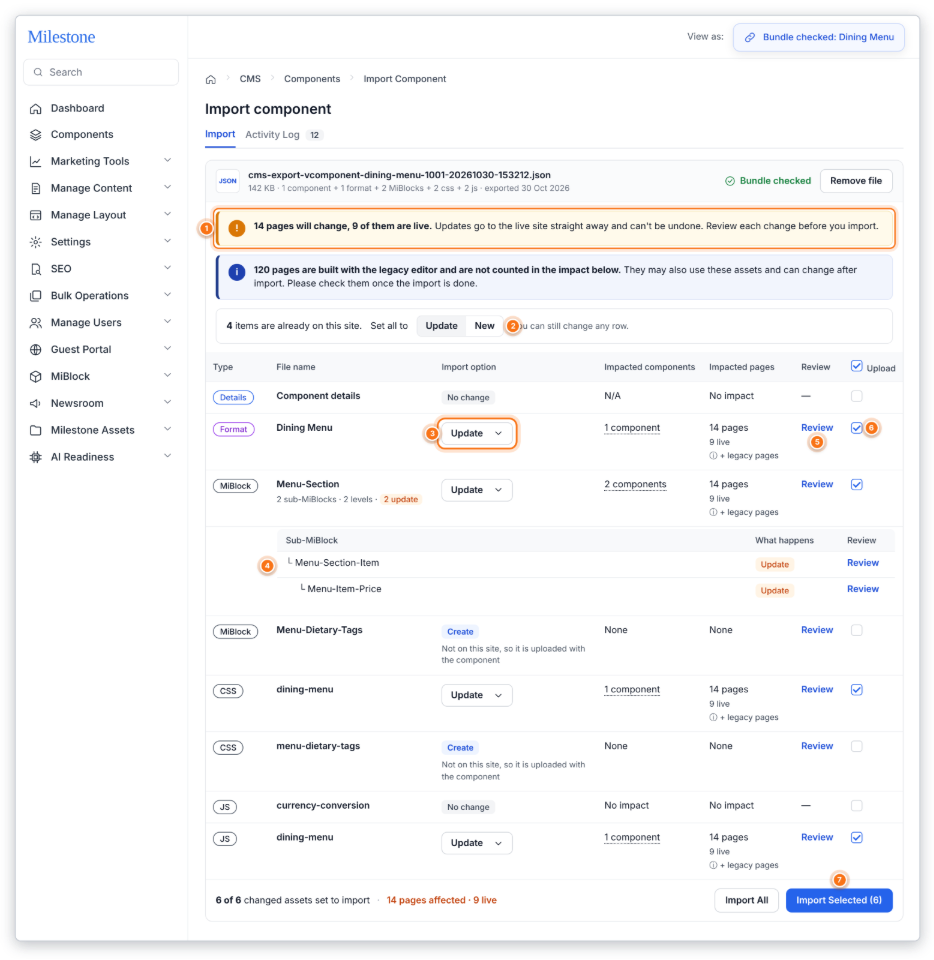
Example B: Update, Create and No change rows, with the yellow banner showing 14 pages and 9 live.
1 | Yellow banner. How many pages will change, and how many are live. |
2 | Set all to Update / New. Choose for every existing item at once. You can still change any row. |
3 | Update. Replaces the item on Production. Pick New to add it as a new item instead. |
4 | Sub-MiBlocks. What happens to each sub-MiBlock. |
5 | Review. Compare what is on Production with the bundle. |
6 | Upload. Tick or untick items that will be updated. |
7 | Import Selected (6). Imports the items set to import. |
Step 3 — Read the table
Column | What it tells you |
Type | Details (the component itself), Format, MiBlock, CSS or JS |
File name | The item's name. A MiBlock row also shows its sub-MiBlocks, for example "2 sub-MiBlocks · 2 levels · 2 update", with a small table of what happens to each one |
Import option | Create, Update, New or No change. See the colour key below. |
Impacted components | How many components on this site use the item. Hover to see them |
Impacted pages | How many pages use it and how many are live. + legacy pages appears when legacy editor pages may also use it |
Review | Opens the comparison for that item |
Upload | Tick or untick items that will be updated. New items are always added; No change rows can't be ticked |
Import option | What happens on Production |
Create | The item is new on this site. It is always added with the component; it needs no tick. |
Update | Replaces the item that is already on this site. |
New | Pick it from the Update menu to add the item as a new one and leave the existing one as it is. |
No change | The item is the same on both sites. Nothing is imported for it. |
Step 4 — Review the changes
Click Review on any row, including a sub-MiBlock.
- MiBlocks open with the MiBlock tree on the left and the tabs Settings, Definitions and Site Level Settings. Each change shows the old value struck out next to the new value, marked Changed or New. Tick Show only changes to hide what is the same.
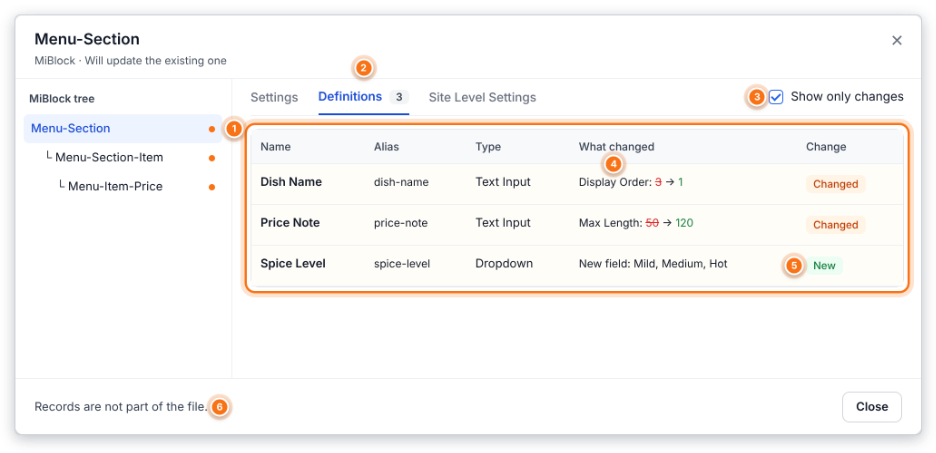
MiBlock review: two fields changed and one new field.
1 | MiBlock tree. Switch between the MiBlock and its sub-MiBlocks. Orange dots mark changes. |
2 | Definitions. Every changed field, with its alias and type. |
3 | Show only changes. Hides fields that are the same. |
4 | What changed. The old value struck out, then the new value. |
5 | New. This field is new in the bundle. |
6 | Records. Records are never part of the file. |
- Formats, CSS and JS open side by side: On this site on the left, Import bundle on the right. Removed lines are red and added lines are green.
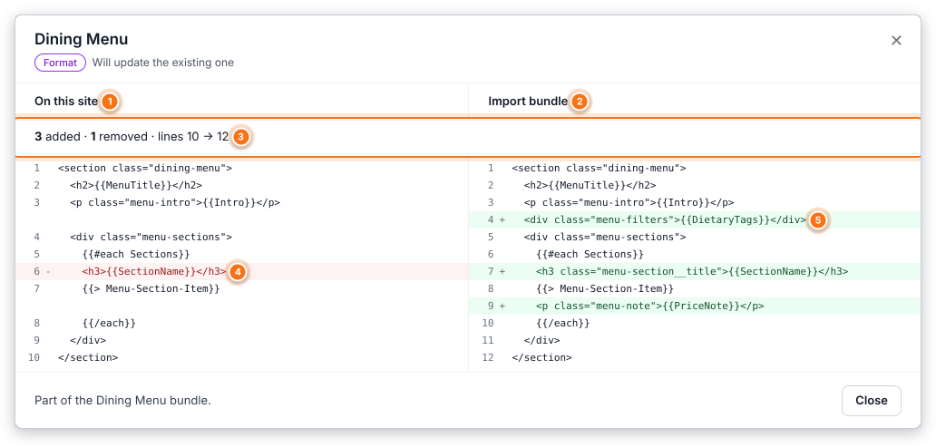
Format review: red lines are removed, green lines are added.
1 | On this site. The Format as it is on Production now. |
2 | Import bundle. The Format as it is in the file. |
3 | Summary. How many lines are added and removed. |
4 | Red line. Removed by the import. |
5 | Green line. Added by the import. |
Note: records are never part of the file, so your content on Production is not touched.
Step 5 — Import
- The footer shows how many changed items are set to import, and how many pages (and live pages) are affected.
- Import Selected (n) imports the items set to import. Import All imports every item that has a change.
- A progress window appears. Keep the page open until it finishes; it can take a minute for components with many MiBlocks.
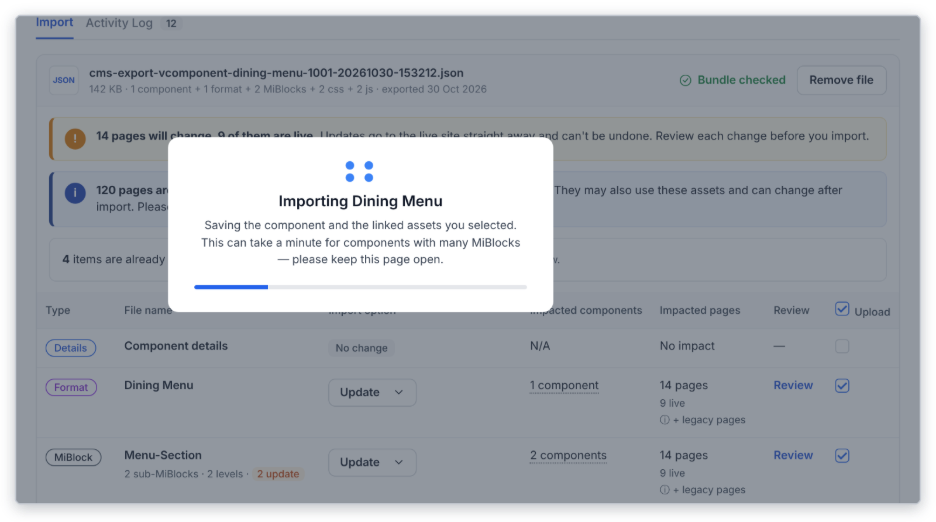
Keep the page open while this runs.
Step 6 — Check the result
- A banner shows Import complete with the counts, for example "2 added, 4 replaced, 2 already up to date". Already up to date means No change.
- Click Details to see each item.
- A message appears in the top-right corner, and the Activity Log count goes up by one.
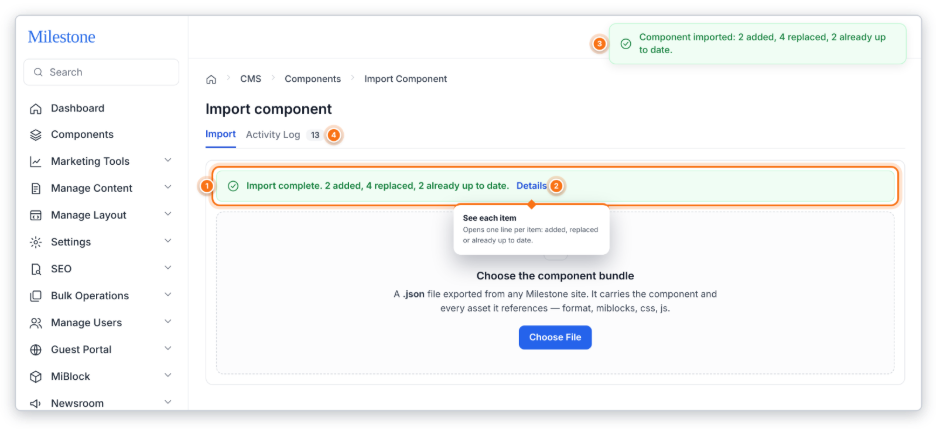
The counts, with Details for each item.
1 | Import complete. The counts. Already up to date means No change. |
2 | Details. One line per item. |
3 | Message. Confirms the import in the top-right corner. |
4 | Activity Log. The count goes up by one. |
Component Activity Log
Open it from View Logs on the Components list, or the Activity Log tab on the import screen. The columns are Date & time, Action, Summary, User and File, with a Details / Hide button on each row.
- Import details: one line per item with its result: Created, Updated (with how many sub-MiBlocks were replaced) or No change. The last line notes that legacy editor pages were not checked for impact.
- Export details: the component and its linked Format, MiBlocks, CSS and JS, and a note that data records are not included.
The example below shows Production after both imports. It also shows the copy of Dining Menu exported from Production just before it was updated, as recommended in The steps at the top.
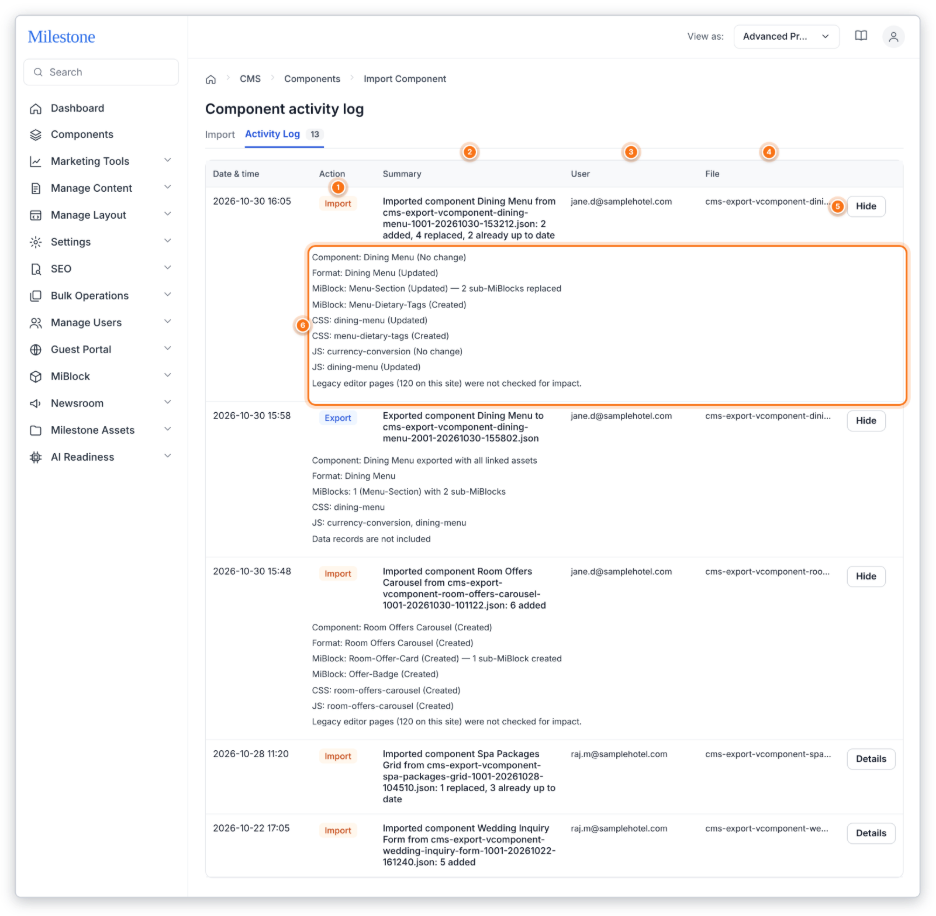
Read from the bottom up: Room Offers Carousel added, a copy of Dining Menu saved, then Dining Menu updated.
1 | Action. Import or Export. |
2 | Summary. The file and the totals. |
3 | User. Who did it. |
4 | File. The file name. |
5 | Details / Hide. Opens or closes the lines for each item. |
6 | Details. One line per item: Created, Updated or No change. |
Activity Log
Every import and export is recorded, so you can see who moved what and when.
Open it from View Logs on the list, or the Activity Log tab on the import screen. Formats, CSS, JS, MiBlocks and Components each have their own log. Exports are logged on the site you exported from, and imports on the site you imported to. Use Refresh to load the latest entries and Newer / Older to page through them.
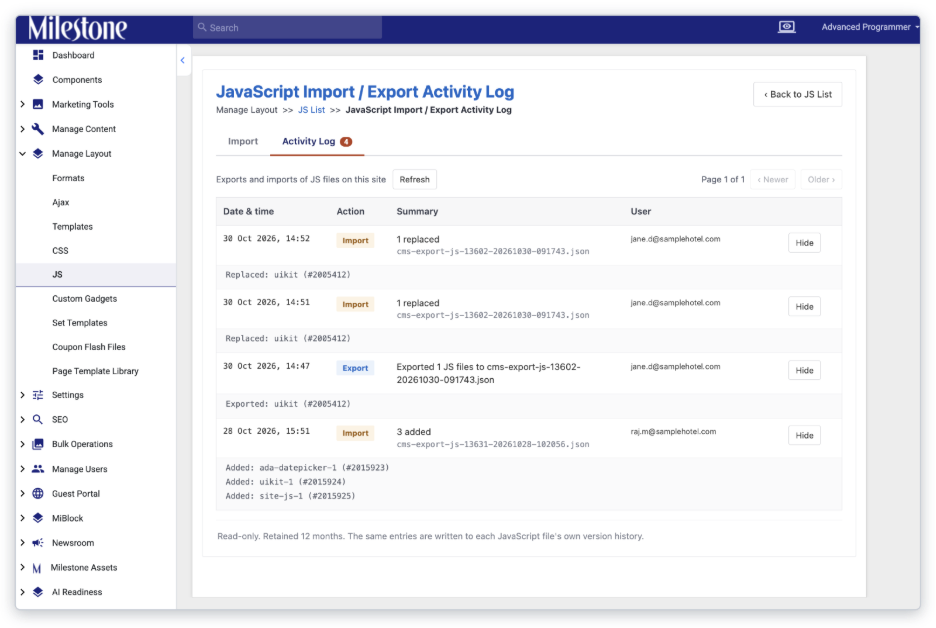
Click Details on a row to see one line per item.
Column | What it shows |
Date & time | When it happened |
Action | Import or Export |
Summary | The totals (for example "1 replaced" or "3 added") and the file name |
User | Who did it |
Details / Hide | One line per item with its ID, for example "Replaced: uikit (#2005412)", "Added: site-js-1" or "Exported: uikit" |
The log is read-only and kept for 12 months. The same entries are also written to each item's own version history.
FAQs
Question | Answer |
What does "Live" mean? | The page is published and visitors can see it. It changes as soon as you import. |
What does "Not live" mean? | Draft, unpublished, or unpublished with draft. Visitors won't see the change until the page is published. |
What are legacy editor pages? | Pages built with the old editor. We can't check which items they use, so they are not in the counts. Check them after importing. |
Can I undo an import? | There is no undo. Imports go straight to live, so review before you import. To go back, import a copy you exported from Production before the change (see The steps at the top). |
How big can a file be? | Up to 10 items and 5 MB per file. |
Is my content (records) moved? | No. Only structure and settings move. Your content stays where it is. |
Where do I see what happened? | In the Activity Log, with the date, user, summary and per-item details. |
Can I move from Production to Staging, or between two other sites? | Yes. Export and import work between any two Milestone sites. This guide uses Staging to Production because it is the most common path. |
What does "already up to date" mean? | The item is the same on both sites, so nothing was imported for it. In the table and the Activity Log it shows as No change. |
Should I export a component or its parts? | Export the component when you changed more than one of its parts, or when it is new. Export a single Format, CSS, JS or MiBlock for a small fix. |
Was this article helpful?
That’s Great!
Thank you for your feedback
Sorry! We couldn't be helpful
Thank you for your feedback
Feedback sent
We appreciate your effort and will try to fix the article