

Knowledge base
Record Manager – User Guide
Overview
The Record Manager lets you move through nested MiBlock components from one screen and edit records in place. This guide is for anyone who manages MiBlock records in the CMS.
Feature | What it does | Where you find it |
Navigation tree | Shows the full component hierarchy on the left, so you can jump to any record | Left panel of the Record Manager |
In-place record edit | Opens a record next to the tree; you save and stay where you are | Click any record in the tree or list |
Navigating the Record Manager
The navigation tree on the left shows the whole component, so you can reach any record without going back and drilling down again.
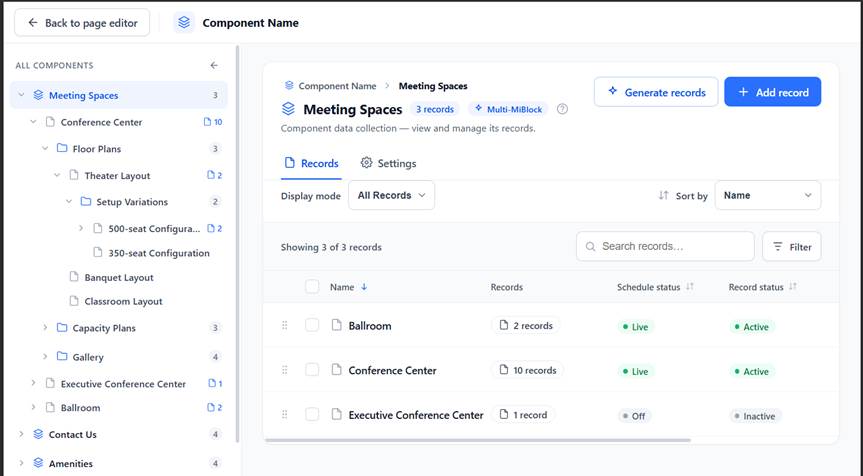
Record Manager with the navigation tree on the left and the record list on the right.
- Open a component from All Components. Its records appear in the main panel.
- Use the arrow next to an item in the tree to expand or collapse it.
- Click any item in the tree to open it in the main panel.
- Use the breadcrumb above the title to jump back to any level.
Reading the tree
- Stacked-layers icon: a component. It holds records.
- Folder icon: a sub-component inside a record, such as Floor Plans under a Meeting Space.
- Page icon: a record. This is the content you edit.
- Number on the right: how many records or sub-items it holds.
In the record list you can search, filter, sort, and drag rows to change their display order. The Records column shows how many child records each one holds.
Editing a record
Click a record in the tree and it opens beside the tree. Edit, save, and move to the next record without losing your place.
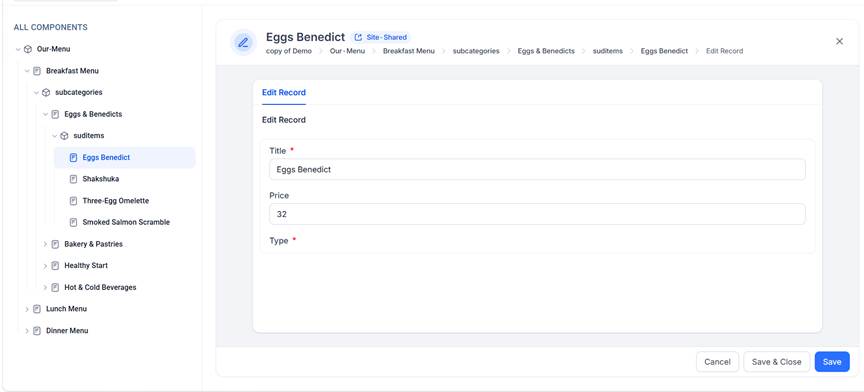
Record edit screen with the tree on the left and the record form on the right.
- Click a record (page icon) in the tree. The edit form opens on the right.
- Check the breadcrumb at the top to confirm where the record sits.
- Change the fields you need. Required fields are marked with a red asterisk.
- Choose how to save:
- Save keeps the record open, so you can click the next record in the tree.
- Save & Close saves and returns you to the record list.
- Cancel discards unsaved changes.
- Close the record with X at any time to return to its list.
Good to know
- A Site-Shared tag means the record is shared across sites. Changes apply everywhere it is used.
- The fields shown depend on how the component is set up, so they differ between components.
- Rich-text fields support formatting and links. Image alt text appears when it is enabled for the component.
Related
To create, update or delete many records at once from an Excel file, see MiBlock Bulk Import & Export – User Guide.
Was this article helpful?
That’s Great!
Thank you for your feedback
Sorry! We couldn't be helpful
Thank you for your feedback
Feedback sent
We appreciate your effort and will try to fix the article