

Knowledge base
MiBlock Bulk Import & Export – User Guide
Overview
You can now create, update and delete MiBlock records in bulk from an Excel file, and export any component's records to an editable workbook. This guide is for anyone who manages MiBlock records in the CMS.
Feature | What it does | Where you find it |
Export | Downloads a component's records to an editable Excel workbook, one tab per level | Export on a component or record page |
Bulk import | Creates and updates records from a workbook, from the level you start on down | Import on a component or record page |
To move around nested components and edit single records, see Record Manager – User Guide.
Exporting records
Export works for every component type. It downloads the records at the level you're on, and every level beneath it, to one Excel workbook you can edit and import back.
- Use the tree to go to the component or record whose contents you want.
- Click Export.
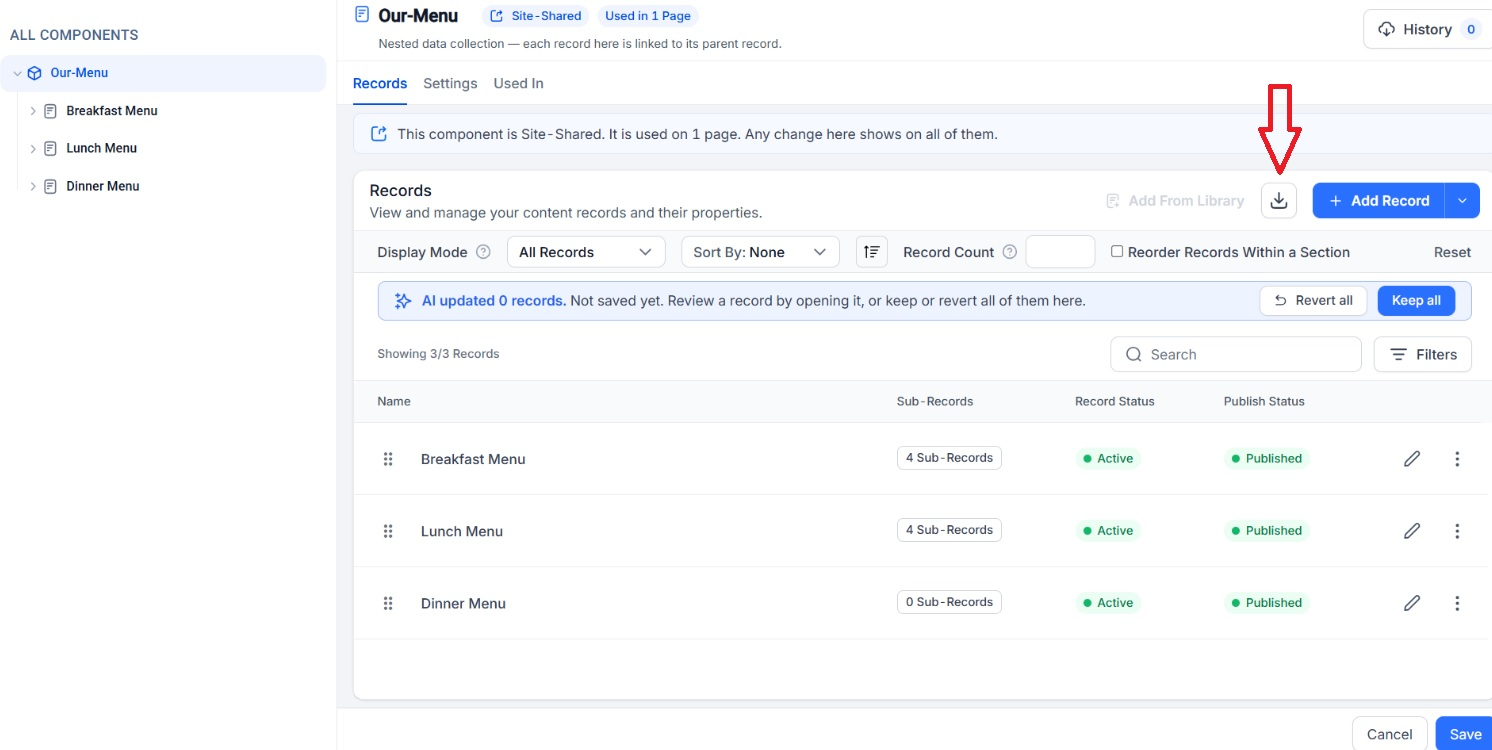 3. Open the downloaded .xlsx file. Its name combines the component, the level you exported from, and the date, e.g. MiblockMenunewL1_20261027.xlsx.
How the workbook matches your component
The workbook is built from your component's structure and field definitions, so every component gets its own layout.
- Instructions tab: always first. It explains how to fill the file and the rules the import checks.
- One tab per component or sub-component, named after it. A record with several sub-components gets a tab for each, e.g. a Meeting Space with Floor Plans, Capacity Charts and Gallery.
- One row per record.
- One column per field defined on that component, in the same order as the record form. Fields added to the component appear in your next export.
Columns every tab has
Column | What it holds |
Record ID (grey) | The system's ID for the record. Don't change it. |
Action * | What the import should do with the row. Exported rows start as NoAction. |
Parent- component name (yellow) | On sub-component tabs only: a drop-down of the records on the parent tab. |
Your component's fields | One per field definition. Fields marked * are required. |
Status | Published or Draft. |
Where you start decides what you get
Export from | Workbook contains |
The component (Level 1) | Every level, the whole tree |
A Level 1 record | That record's sub-components and everything below them |
A record further down | Only its own sub-components and below |
Importing records
Import works for every component type. It creates, updates and deletes records from the workbook, starting at the level you're on and covering every level beneath it. Only rows with an Action are imported.
Get a file to fill
- Records already exist: click Export, edit the file, and import it back.
- Starting from scratch: download the template with Download it here in the Import from Excel window. It has the same tabs and columns for your component, with no rows.
- Component fields have changed: export again first, so your file has the current columns.
Fill the file
- Work top to bottom, from the first data tab to the last. Each child row needs its parent to exist first.
- Record ID: leave it unchanged on existing rows. Leave it blank on new rows; the ID is created on upload.
- Action *: set it on every row you want imported.
- Create: add a new record.
- Update: change an existing record.
- Delete: remove a record.
- NoAction: leave the record unchanged. Exported rows start with this.
- Rows with a blank Action are skipped.
- Parent: on sub-component tabs, pick the parent from the yellow drop-down. It lists only records on the parent tab.
- Fill the fields marked *. Set Status to Published or Draft.
- Don't rename tabs or column headers.
Entering values by field type
Each column follows the type of its field in the component definition. Columns with a fixed list of values come with a drop-down.
Field type | What to enter | Example |
Text input | Single line, within the field's length limit | Conference Center |
Text area | Plain text; press Alt+Enter for a new line | Seats up to 800. |
Rich text | The text as HTML | <p>Seats <strong>800</strong></p> |
Radio button / dropdown | One value from the drop-down | Published |
Multi-select | Allowed values, separated by commas | Vegan, Gluten-Free |
Checkbox | A value from the drop-down | Yes |
Date picker | A real date | 01-Jun-2026 |
Number / price | The value as it should appear | 15 |
Image | The DAM link of an image already uploaded to assets | https://mds-assets.marriott.com/… |
JSON, array and relationship fields can't be edited through import. Update them in the record editor.
Upload the file
- Go back to the page you exported from or want to import into.
- Click Import. The Import from Excel window opens.
- Drop your file into the window, or click browse. Accepted types are .xls, .xlsx and .csv, up to 1 MB.
- Click Upload.
Need a sample file? Click Download it here in the same window to get the template for this component.
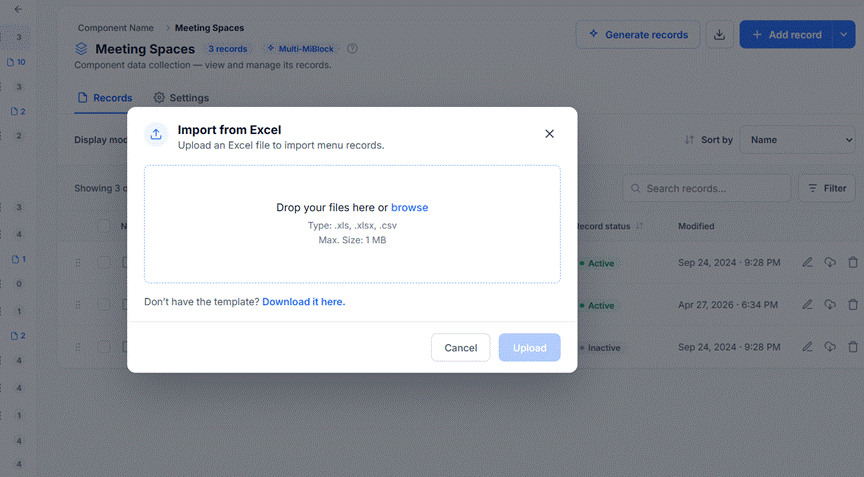
Import from Excel window, with the template link at the bottom.
If some rows have errors
The CMS checks every row before anything is saved. If any rows fail, the window shows how many, and you choose what to do:
- Import N valid rows: save the rows that pass now.
- Download error report: get the rows that failed, with what to fix. Correct them and upload that file the same way.
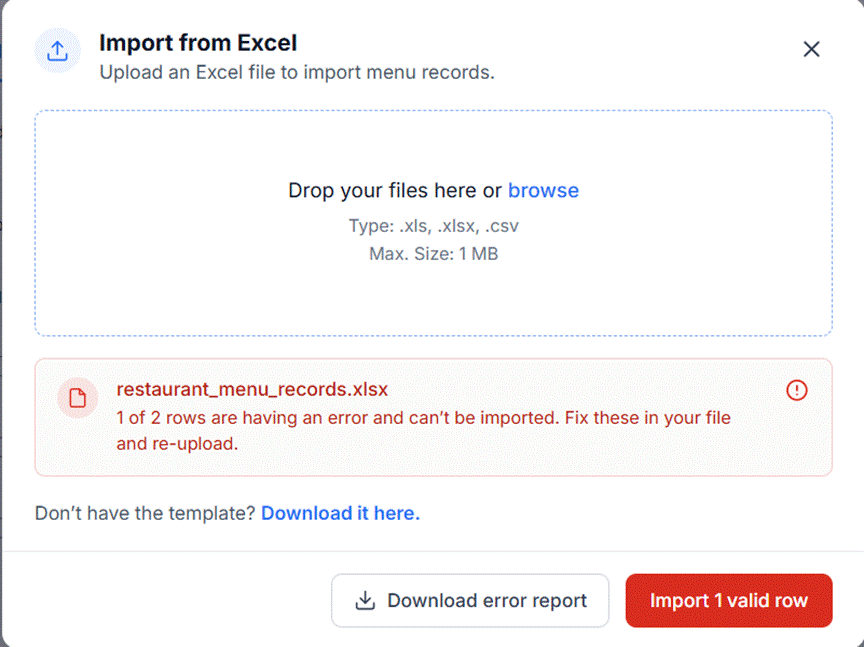
Import from Excel window: 1 of 2 rows has an error, with Download error report and Import 1 valid row.
Large imports also send an email when they finish.
Example: a Menu workbook
This example shows a three-level Menu component exported from Level 1. Your component's tabs and columns will follow its own definitions.
Tab | Level | Parent column |
Menu-new | 1 | None. These are the top-level records. |
Menu-new Section | 2 | Parent- Menu-new |
Menu-new Section Item | 3 | Parent- Menu-new Section |
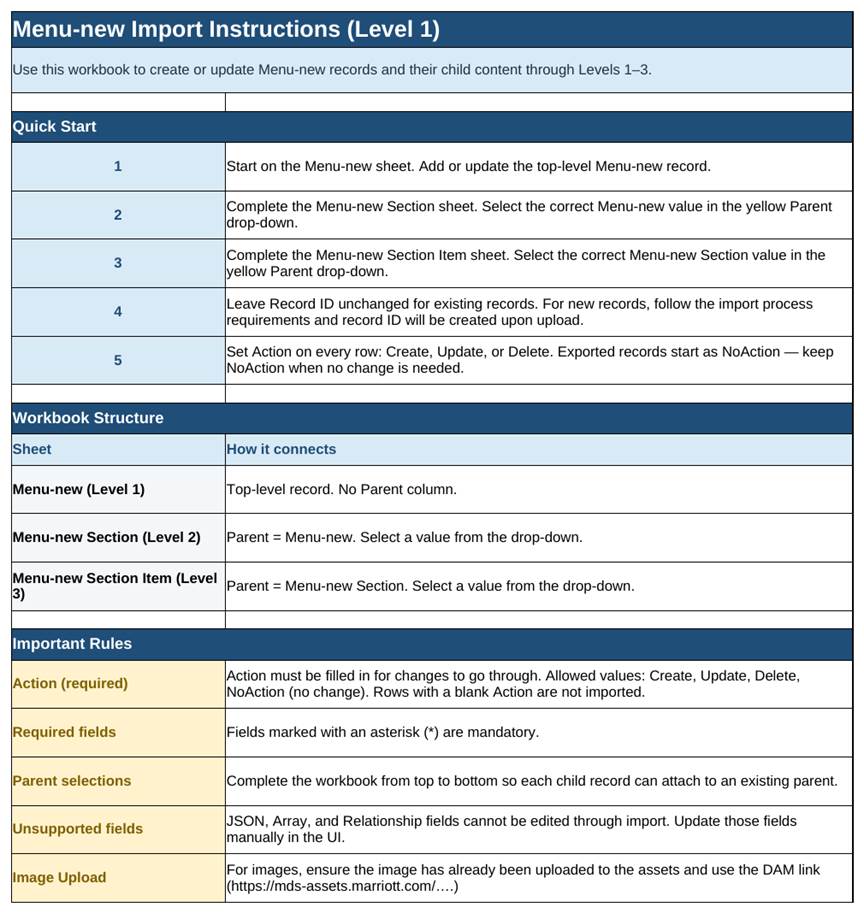
Instructions tab.

Menu-new tab (Level 1): top-level records, no Parent column.

Menu-new Section tab (Level 2): each row picks its menu in the yellow Parent column.
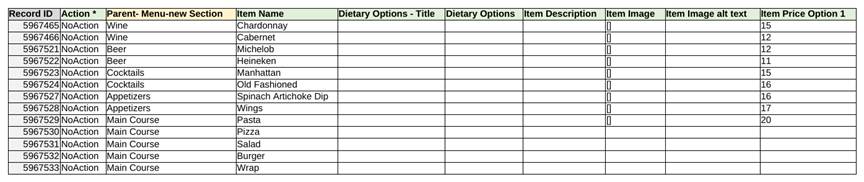
Menu-new Section Item tab (Level 3), first columns: each item picks its section.
The Item tab continues with more fields from the definition, such as price options and add-ons.
Import results
Every import ends in one of three results. Rows that pass are saved; rows that fail come back in a failed-rows file for you to fix. Download it with Download error report in the import window, or from the email for large imports.
Result | What it means | What to do |
Success | Every row was imported, e.g. "40 of 40 rows imported" | Nothing. Your records are live. |
Partial | Some rows imported and some failed, e.g. "36 imported · 4 failed" | Download the failed rows, fix them, and import that file. |
Failed | No rows were imported, e.g. "0 of 12 rows imported" | Download the failed rows, fix them, and import that file. |
The failed-rows file
- It contains only the rows that failed, so importing it again won't duplicate rows that already passed.
- It keeps the same tabs, columns and drop-downs as your original file.
- Cells with errors are filled red.
- An Import result column at the end of each tab says what's wrong and how to fix it.
- An Import result tab at the front summarises errors by type.

Failed-rows file: error cells in red, with an Import result column explaining each fix.
Fixing and importing again
- Open the failed-rows file. Filter the Import result column to show only rows with messages.
- Fix the red cells. Use the drop-downs for parent, status and action values.
- If a parent record failed, fix it first. Its child rows will clear once the parent imports.
- Save the file and upload it with the Import button. The Import result column is ignored on upload.
Notifications and emails
Small imports and exports show their result on screen. Large ones run in the background and email you when they finish, so you don't have to wait on the page.
- When a large run starts: a message confirms it has started and that you'll get an email.
- When it finishes:you get one email with the result:
- Success: the counts of records created, updated and removed, with a link to the records.
- Some rows failed: how many rows failed, the most common issues, and a link to the failed-rows file.
- Failed: the reason, a link to the failed-rows file, and a link to a blank template.
If you're still on the page when it finishes, you'll see the result on screen instead of an email.
Common errors and FAQs
Most import errors come from a missing parent, a missing required value, or a value outside a drop-down list.
Message you see | What it means | How to fix |
Parent "X" doesn't exist | The parent named in the row isn't on the tab above or in the CMS | Pick a parent from the drop-down |
Parent "X" wasn't imported because it has errors | The parent row in the same file failed | Fix the parent row first |
Name is required | A required field is blank | Enter a value |
"X" appears twice under this parent | Two rows have the same name under one parent | Rename or remove one |
"X" isn't a valid Status | The value isn't in the allowed list | Pick a value from the drop-down |
Must be a number | Text was entered in a number field | Enter digits only, e.g. 800 |
Can't be negative | A negative number where only positive values are allowed | Enter a positive number |
Isn't a valid date | The date can't be read | Use a date like 01-Jun-2026 |
Is over the character limit | Text is longer than the field allows | Shorten the text |
The HTML isn't valid | Rich text has unclosed or broken tags | Close every tag you open |
The "X" tab is missing or renamed | The file's structure was changed | Restore the tab name or start from a fresh export |
FAQs
Does import create the component itself?
No. The component is set up in the CMS. Import creates and updates the records inside it.
If I remove a row from the file, is that record deleted?
No. Only rows with Action set to Delete are removed.
Can I import the whole component in one file?
Yes. Start the import from the top level of the component.
Will re-importing my original file create duplicates?
Rows set to Create are created again. After a partial import, upload the failed-rows file, not the original.
What if an export fails?
The reason shows on screen, or in the email for large exports. Run Export again; if it timed out, export from a lower level.
What file types are supported?
.xls, .xlsx and .csv, up to 1 MB per file.
Was this article helpful?
That’s Great!
Thank you for your feedback
Sorry! We couldn't be helpful
Thank you for your feedback
Feedback sent
We appreciate your effort and will try to fix the article